
Dangerous Rain — Inteleon VMAX in Standard
Hello everyone! I hope you all have been enjoying our new Fusion Strike set — I certainly have been! While this set hasn’t been the strongest compared to recent ones, it nonetheless does have a few good decks in it, including Mew VMAX, Gengar VMAX, and the deck I’ll be talking about today; Inteleon VMAX.
Intro to Inteleon VMAX
Inteleon VMAX is a bit of a different Rapid Strike deck than the [card name=”Rapid Strike Urshifu VMAX” set=”Battle Styles” no=”88″ c=”name”][/card] or [card name=”Sylveon VMAX” set=”Evolving Skies” no=”212″ c=”name”][/card] decks, but it does fit in well with the idea of slowly building toward your KOs, as opposed to aiming for OHKOs.
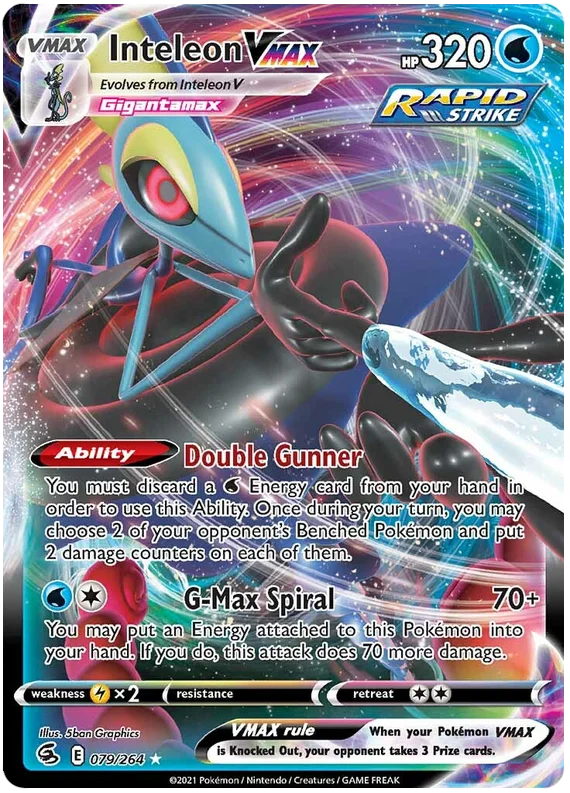 With this deck, you’ll be spreading around damage like crazy between Double Gunner and [card name=”Inteleon” set=”Chilling Reign” no=”43″ c=”name”][/card]’s Quick Shooting, which can add up pretty quickly. Add in some efficient damage from G-Max Spiral, and the damage can become tough to deal with for any opposing deck. To push Inteleon VMAX over the edge, it is also seemingly purpose-built to use [card name=”Cheryl” set=”Battle Styles” no=”123″ c=”name”][/card], which all but guarantees that it will win a battle of 2HKOs. Against the right matchups, Inteleon VMAX can be a tough deck to deal with, and its matchup spread is good enough that it’s an archetype that should stick around. It’s definitely a deck worth familiarizing yourself with, whether you play with it or against it!
How this deck works is that it wins by slowly grinding the opponent down with a combination of G-Max Spiral and Ability damage, while preventing the opponent from getting Knock Outs with Cheryl. Since G-Max Spiral can be used for a single [card name=”Rapid Strike Energy” set=”Battle Styles” no=”140″ c=”name”][/card], and it returns that Energy to your hand every turn, you can use Cheryl with practically no downside. As such, so long as you are able to use Cheryl, you can prevent your opponent from taking any KOs, which gives you plenty of time to set up Knock Outs of your own.
At 140 damage, G-Max Spiral isn’t the most damaging attack, but when you add in extra damage from Double Gunner and Quick Shooting, it becomes more than adequate. Typically, Inteleon VMAX can 2HKO any other VMAX, and can either OHKO or come close enough to OHKOing regular Vs so that it can take a KO every turn. Thanks to [card name=”Training Court” set=”Rebel Clash” no=”169″ c=”name”][/card], we can recycle Water Energy so that we can use Double Gunner every turn, even with a rather low Energy count. On a typical turn, you’ll be able to do around 220 damage, which is pretty solid when you can heal as well!
To solve the issue of being able to find Rapid Strike Energy, both initially and if your opponent sends your hand away with [card name=”Marnie” set=”Sword and Shield” no=”169″ c=”name”][/card], this deck also plays [card name=”Octillery” set=”Battle Styles” no=”37″ c=”name”][/card], which can find it every turn if needed. Most of the time, Inteleon VMAX is a rather consistent deck, as you have both [card name=”Drizzile” set=”Sword and Shield” no=”56″ c=”name”][/card] and Octillery to search for what you need, which as it turns out isn’t that much! To further go into that point, let me share my list of Inteleon VMAX, which you can see below:
My Inteleon VMAX List
[decklist name=”Inteleon VMAX NEW” amt=”60″ caption=”” cname=”Inteleon VMAX” set=”Fusion Strike” no=”79″][pokemon amt=”24″]3x Inteleon VMAX (Fusion Strike #79)4x Inteleon V (Fusion Strike #78)3x [card name=”Inteleon” set=”Chilling Reign” no=”43″ c=”deck2″ amt=”3″][/card]1x [card name=”Inteleon” set=”Sword and Shield” no=”58″ c=”deck2″ amt=”1″][/card]4x [card name=”Drizzile” set=”Sword and Shield” no=”56″ c=”deck2″ amt=”4″][/card]4x [card name=”Sobble” set=”Chilling Reign” no=”41″ c=”deck2″ amt=”4″][/card]2x [card name=”Octillery” set=”Battle Styles” no=”37″ c=”deck2″ amt=”2″][/card]2x [card name=”Remoraid” set=”Battle Styles” no=”36″ c=”deck2″ amt=”2″][/card]1x Basculin (Fusion Strike #70)[/pokemon][trainers amt=”30″]4x [card name=”Cheryl” set=”Battle Styles” no=”123″ c=”deck2″ amt=”4″][/card]2x [card name=”Korrina’s Focus” set=”Battle Styles” no=”128″ c=”deck2″ amt=”2″][/card]2x [card name=”Marnie” set=”Sword and Shield” no=”169″ c=”deck2″ amt=”2″][/card]2x [card name=”Boss’s Orders” set=”Shining Fates” no=”58″ c=”deck2″ amt=”2″][/card]1x [card name=”Professor’s Research” set=”Shining Fates” no=”60″ c=”deck2″ divide=”yes” amt=”1″][/card]4x [card name=”Evolution Incense” set=”Sword and Shield” no=”163″ c=”deck2″ amt=”4″][/card]4x [card name=”Quick Ball” set=”Sword and Shield” no=”179″ c=”deck2″ amt=”4″][/card]4x [card name=”Level Ball” set=”Battle Styles” no=”129″ c=”deck2″ amt=”4″][/card]1x [card name=”Scoop Up Net” set=”Rebel Clash” no=”165″ c=”deck2″ amt=”1″][/card]1x [card name=”Capacious Bucket” set=”Rebel Clash” no=”156″ c=”deck2″ amt=”1″][/card]1x [card name=”Pal Pad” set=”Sword and Shield” no=”172″ c=”deck2″ divide=”yes” amt=”1″][/card]3x [card name=”Training Court” set=”Rebel Clash” no=”169″ c=”deck2″ amt=”3″][/card]1x [card name=”Tower of Waters” set=”Battle Styles” no=”138″ c=”deck2″ divide=”yes” amt=”1″][/card][/trainers][energy amt=”6″]3x [card name=”Rapid Strike Energy” set=”Battle Styles” no=”140″ c=”deck2″ amt=”3″][/card]3x [card name=”Water Energy” set=”Evolutions” no=”93″ c=”deck2″ amt=”3″][/card][/energy][/decklist]
Pokemon
Our Pokemon here consist of our Inteleon VMAX line, our other [card name=”Inteleon” set=”Chilling Reign” no=”43″ c=”name”][/card] line, our [card name=”Octillery” set=”Battle Styles” no=”37″ c=”name”][/card] line, and a friendly fish called Basculin. Inteleon helps the deck to pack some extra punch, whereas Octillery helps out the deck’s consistency, particularly against the threat of hand disruption. Since you want to return your [card name=”Rapid Strike Energy” set=”Battle Styles” no=”140″ c=”name”][/card] to your hand every turn with G-Max Spiral, any time your opponent plays a [card name=”Marnie” set=”Sword and Shield” no=”169″ c=”name”][/card], that means that you have to find your Energy again. Without Octillery, we don’t have any way to search out that Energy, which is a big problem when you need to re-attach it every turn. If you can’t find it, that’s a missed turn of attacking, which is never ideal. With Octillery, however, that isn’t nearly as much of a problem!
 On turns where you don’t have to find your Rapid Strike Energy, Octillery is still a great card to have in play, as it can search out almost all of your Pokemon (the big exception being [card name=”Drizzile” set=”Sword and Shield” no=”56″ c=”name”][/card]), as well as [card name=”Korrina’s Focus” set=”Battle Styles” no=”128″ c=”name”][/card] if you need a Supporter, or [card name=”Tower of Waters” set=”Battle Styles” no=”138″ c=”name”][/card] if you need a way to retreat or a counter-Stadium. It’s really nice to be able to have that extra Pokemon search, especially as you try to build up your board toward multiple Inteleon. Likewise, if you play against Inteleon VMAX, it is a solid strategy to KO their Octillery, then try to buy some free turns with Marnie.
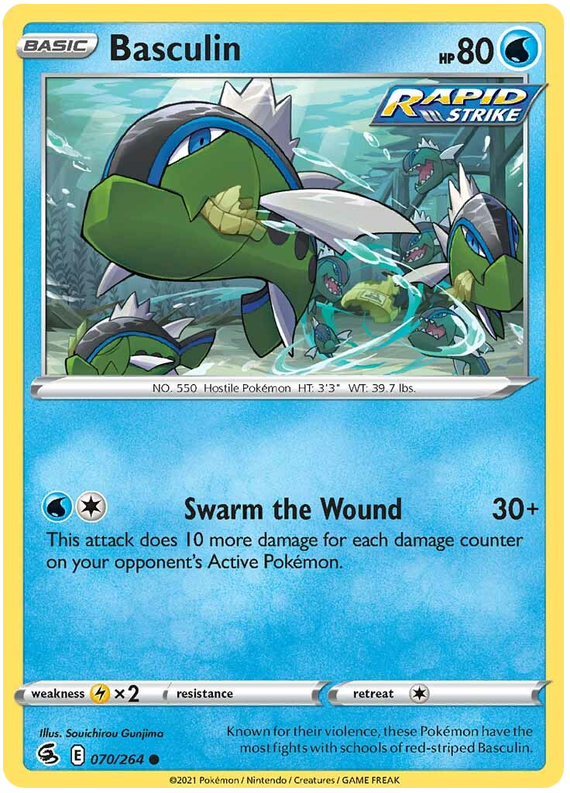
The one copy of Basculin is a fun tech against opposing VMAX decks, which turns out to be pretty important in some matchups. What Basculin does is that it gives you an easier way to 2HKO VMAXs. After using G-Max Spiral, you only need to hit the damaged VMAX with one use of Double Gunner or Quick Shooting to bring it into Basculin’s KO range. Against VMAXs with higher HP, such as [card name=”Eternatus VMAX” set=”Darkness Ablaze” no=”117″ c=”name”][/card] or [card name=”Rapid Strike Urshifu VMAX” set=”Battle Styles” no=”88″ c=”name”][/card], that can often be the difference between getting a 2HKO and missing it. Basculin can also help you get a KO if you’re in an awkward situation where you can’t get enough Inteleon into play, which can help you get past slower starts.
As for the Inteleon VMAX, we play the standard 4-3 line and 4-4-3-1 [card name=”Inteleon” set=”Sword and Shield” no=”58″ c=”name”][/card] split. I have seen some lists go lighter on one of these Pokemon (typically they play one less Quick Shooting Inteleon), but I’ve never been thrilled about cutting down due to the lower consistency. Two Quick Shooting Inteleon is an amount you can get by with, but it can quickly become awkward if you prize one of them. Likewise, you can cut down on the Inteleon VMAX line in theory, as you’ll almost never use more than two. In this case, Prizes aren’t as much of an issue, so much as that playing the heavier line helps you to get the VMAX into play consistently on turn two. For that reason, I prefer the higher counts.
[premium]
Trainers and Energy
This deck doesn’t play many draw Supporters, as you don’t need that many in this deck. Drizzile and Octillery help you to find what you need, but more importantly, you don’t actually need to have much draw power once you are set up. Once you get past the setup phase of the game, you’ll have a much bigger need for the other Supporters in this deck. [card name=”Cheryl” set=”Battle Styles” no=”123″ c=”name”][/card] is the key to this deck’s strategy, so we play the maximum of four copies. [card name=”Pal Pad” set=”Ultra Prism” no=”132″ c=”name”][/card] gives you the potential to use Cheryl even more often for grindier matchups, or it lets you recycle [card name=”Boss’s Orders” set=”Rebel Clash” no=”154″ c=”name”][/card] or Marnie if needed. Even if you don’t necessarily need to use six Cheryl in a game, shuffling any back will increase your chances of drawing into them. Of the draw Supporters that we do play, we want to have a few Korrina’s Focus, so that we can search for a draw Supporter with Rapid Strike Search if we need to. Other than that, we have two Marnie for when we want to disrupt our opponent and a [card name=”Professor’s Research” set=”Sword and Shield” no=”178″ c=”name”][/card] for when we don’t.
Because of how important Pokemon setup is, this is a deck that wants to play all twelve of the Pokemon-searching Items that it does. The other Items are all one-ofs, as you shouldn’t need more than one. [card name=”Capacious Bucket” set=”Rebel Clash” no=”156″ c=”name”][/card] is used for finding your Water Energy early; playing this card gives us a way to find Water Energy with Drizzile so that we can start using Double Gunner. The [card name=”Scoop Up Net” set=”Rebel Clash” no=”165″ c=”name”][/card] will be used as a switching card a decent amount of the time, but it also lets you reuse an Inteleon or Drizzile, making it a better option than simply playing [card name=”Switch” set=”Sword and Shield” no=”183″ c=”name”][/card]. As for our Stadiums, [card name=”Training Court” set=”Rebel Clash” no=”169″ c=”name”][/card] is another great combo card in this deck, as it effectively guarantees that you can use Double Gunner every turn so long as it is in play. I’ve also included one Tower of Waters, to give the deck a searchable “switch” card. By playing four Stadiums, we have plenty of outs to bump whatever Stadium our opponent might have in play — common obnoxious ones include [card name=”Path to the Peak” set=”Chilling Reign” no=”148″ c=”name”][/card] (which shuts down Double Gunner), [card name=”Old Cemetery” set=”Chilling Reign” no=”147″ c=”name”][/card], and [card name=”Crystal Cave” set=”Evolving Skies” no=”144″ c=”name”][/card], though any opposing Stadium is typically worth removing.
[cardimg name=”Octillery” set=”Battle Styles” no=”37″ align=”right” c=”none”][/cardimg]
My Energy count might seem a bit awkward since I do need a [card name=”Rapid Strike Energy” set=”Battle Styles” no=”140″ c=”name”][/card] every turn, but because I have [card name=”Octillery” set=”Battle Styles” no=”37″ c=”name”][/card], I’m able to reduce that count slightly to fit in another card. Playing only three Rapid Strike Energy does make us more vulnerable to hand disruption if we lose our Octillery, but I don’t believe that the fourth Rapid Strike Energy gives us enough of an advantage in that situation to justify playing it over one of the other cards in this list. The three Water Energy are almost exclusively used for Double Gunner. This amount gives us two opportunities to have a turn where we use Double Gunner twice (once normally, once with Training Court recovery), and also gives us adequate protection against poor Prizes (as it’s quite rare to prize all three Energy). The Water Energy also gives us an out in case we get trapped by [card name=”Dusknoir” set=”Vivid Voltage” no=”71″ c=”name”][/card] or [card name=”Duraludon VMAX” set=”Evolving Skies” no=”123″ c=”name”][/card].
General Strategy
The setup plan for this deck is to try to get an Inteleon VMAX out, as well as an assortment of regular [card name=”Inteleon” set=”Chilling Reign” no=”43″ c=”name”][/card] and an Octillery. Early on, your goal will be to find as many of those Basic Pokemon as possible; if you can get up to a full Bench, it’s a good idea to. When going first, you’ll want to start with Inteleon V if you can, so that it’s easy to get into an Inteleon VMAX on turn two; Inteleon V is also unlikely to get KO’d on turn one, whereas your other Pokemon can be. When going second, you’ll instead want to start with [card name=”Sobble” set=”Chilling Reign” no=”41″ c=”name”][/card], so that you can search for more Basic Pokemon with Keep Calling.
After you have your Basic Pokemon out, you want to evolve as much as you can, so that you can get your Inteleon in play. If you have out multiple Sobble, a good move is to have each [card name=”Drizzile” set=”Sword and Shield” no=”56″ c=”name”][/card] search for a [card name=”Level Ball” set=”Battle Styles” no=”129″ c=”name”][/card], followed by another Drizzile, until you have evolved all of your Sobble. You’ll also of course want to find an Octillery and an Inteleon VMAX as well; you can grab them both by using your last Drizzile to search for an [card name=”Evolution Incense” set=”Sword and Shield” no=”163″ c=”name”][/card], then using Rapid Strike Search to search for your Inteleon VMAX. If you already have one of these pieces in your hand, then you can instead search for something else you might need, like a Supporter or a Rapid Strike Energy (in the case of Octillery), or grab something you might want for the following turn (like an additional Evolution Incense). An ideal board for this deck will consist of a pair of Inteleon VMAX, two Inteleon, a Drizzile, and an Octillery, though you can delay putting the second Inteleon V into play in favor of a [card name=”Remoraid” set=”Battle Styles” no=”36″ c=”name”][/card] or Sobble if needed (this can be better against Bench-damaging decks).
Once you’re set up, your card-finding strategy will pivot instead to doing what you can to maintain your Inteleon VMAX and its attack. From this point, your turn will typically consist of using either Cheryl or Boss’s Orders, placing damage with your Abilities, and hitting for 140 and bouncing your Energy back. If you do get hit by a [card name=”Marnie” set=”Sword and Shield” no=”169″ c=”name”][/card], you’ll likely need to re-find your Rapid Strike Energy, but that’s a pretty easy thing to do so long as Octillery is in play; likewise, if your opponent KOs your Octillery, you’ll want to replace it as soon as possible. If you don’t have Cheryl or Boss’s Orders, that’s when you’ll want to use your draw Supporters to try to find those for a future turn. There isn’t much else that you’ll need; Inteleon VMAX is pretty self-sustaining once the whole board is established.
When placing your damage, you’ll want to try to set things up so that you bring their Pokemon into range of a G-Max Spiral KO or 2HKO. You’ll want to prioritize damaging their attackers in most cases since they’ll be bringing those Pokemon to the Active Position on their own (so you don’t have to [card name=”Boss’s Orders” set=”Rebel Clash” no=”154″ c=”name”][/card] to take advantage of your damage). Any extra damage can be spread around to bring other Pokemon into KO range. Against decks with lower HP, you can instead use extra damage to slowly build up one of their non-attackers to be KO’d; this can be a good way to take down their support Pokemon (for example, [card name=”Cherrim” set=”Battle Styles” no=”8″ c=”name”][/card] in [card name=”Regidrago” set=”Evolving Skies” no=”124″ c=”name”][/card]). While placing your damage, do be aware of any healing or functionally similar effects (like [card name=”Scoop Up Net” set=”Rebel Clash” no=”165″ c=”name”][/card]) that your opponent might have, and try to play around them by spreading out damage among multiple targets.
Matchup-Specific Strategies
Vs. Mew VMAX / Genesect VMAX
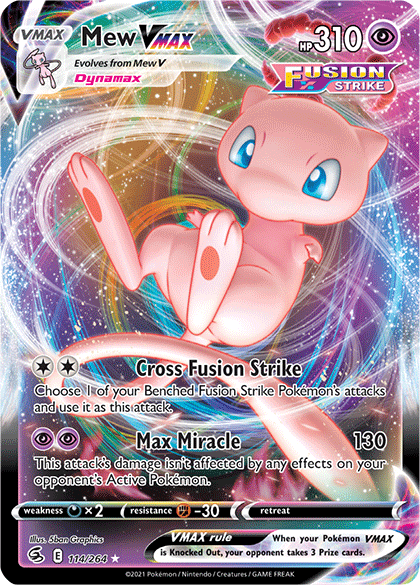 This matchup is an incredibly interesting one, as both players have a variety of tricks that they can use to gain an advantage. The only way Mew VMAX can OHKO Inteleon VMAX is to play four Power Tablet in the same turn or to use a tech like Meloetta at its maximum damage output, however, Inteleon certainly can’t OHKO Mew VMAX, and Mew VMAX does have a way to avoid KOs by copying Mew V’s Psychic Leap. On top of that, Fusion Strike Energy prevents you from being able to do any additional damage with Double Gunner or Quick Shooting, so you’ll only be able to 3HKO Mew VMAX at best. Neither of those factors bode well for Inteleon VMAX, so this matchup is much closer than it would normally be for a deck with Mew’s damage output.
In my experience, this matchup actually can be favorable for Inteleon VMAX, even though the early tournament results seem to point in Mew VMAX’s favor. The key is that you have to plan to take at least two KOs via [card name=”Boss’s Orders” set=”Rebel Clash” no=”154″ c=”name”][/card], if not three. If you don’t have access to the third Boss’s Orders (because of Prizes, or if you can’t find your [card name=”Pal Pad” set=”Sword and Shield” no=”172″ c=”name”][/card]), then you will have to try to get the other Knock Out either early while your opponent is still establishing their board (not a large window against Mew VMAX), or by slowly grinding away at them while keeping yourself alive with [card name=”Cheryl” set=”Battle Styles” no=”123″ c=”name”][/card]. You’ll want to be vigilant about spreading damage around when you can; if you can get their Mew V up to 40 damage before they can attach to it, then it will be in 2HKO range. Basculin is huge in this regard, as it lets you get the KO with only one hit from Double Gunner — which will often be all you get before they can attach a Fusion Strike Energy to it. It isn’t terribly easy to loop Psychic Leap, so at some point, you should be able to get them into a scenario where they have to either put themselves at risk of being KO’d, or else miss a turn of attacking.
Another fun play is to force your opponent to decide between using Psychic Leap and preventing a KO, or taking a KO on your Inteleon VMAX; most of the time, you want them to take the trade, as that makes it a bit easier to win via Boss’s Orders. In order to win via Boss’s Orders, you’ll have to take down several of their Genesect V. Of course, you have to be careful when damaging them. One thing you don’t want to do is to put exactly 40 damage on a single Genesect V, as that isn’t enough for G-Max Spiral to KO it — your opponent can then stop your plans by putting a Fusion Strike Energy on the damaged Genesect V, preventing you from getting a KO. Instead, try to spread out your damage among their Genesect V first (that is, put two at 20 instead of one at 40), so that you can have less wasted Ability uses. Once you can get them to KO range, you’ll want to do so immediately.
Do be aware of Oricorio, as if it is in play, you’ll need to get your opponent’s Genesect V to 80 damage instead; in this case, the same damage spread strategy works, you’ll just want to spread the damage around a bit longer. While doing all of this, you’ll want to keep with your normal G-Max Spiral strategy to apply pressure to their Mew VMAX; even if you don’t actually get any KOs this way, it will at least force your opponent to use up some resources. If you can keep up the pressure and keep finding Cheryl, you should be able to win this matchup, but it is definitely one that can go either way.
Vs. Single Strike Decks
As great as the Cheryl strategy tends to be against opponents that can’t OHKO your Pokemon, it expectedly falls flat against opponents that can. Single Strike decks are the best example of this, but you’ll run into similar problems against a set up [card name=”Shadow Rider Calyrex VMAX” set=”Chilling Reign” no=”75″ c=”name”][/card] deck or [card name=”Rayquaza VMAX” set=”Evolving Skies” no=”111″ c=”name”][/card] deck as well. The math is pretty straightforward in these games: they can OHKO you, you can’t, so they will take their Prizes faster. In practice, things can be a bit more complicated thankfully, so these matchups aren’t auto-losses, though I wouldn’t consider them favorable.
 For [card name=”Single Strike Urshifu VMAX” set=”Battle Styles” no=”86″ c=”name”][/card] to OHKO you, they’ll need to have three [card name=”Single Strike Energy” set=”Battle Styles” no=”141″ c=”name”][/card] attached, after which they’ll have to find a way to re-attach those three Energy to get a second OHKO. In the case of Gengar VMAX, they’ll need to attach all four of their Single Strike Energy. Neither of these are necessarily impossible — the Single Strike Urshifu VMAX scenario is actually rather easy to pull off — but they can take some time.
For the Inteleon VMAX player, that time is quite valuable, as it gives you an opportunity to try to set up some Knock Outs of your own. Since Single Strike Roar damages their Pokemon, anything they attack you with will naturally be in 2HKO range. If you can, you’ll want to put any Ability damage you have on their Single Strike Urshifu VMAX or Gengar VMAX, as you can actually get them in the KO range of Basculin if you’re able to damage them enough.
Another option in this matchup is to try to buy yourself a turn by not attacking with Inteleon VMAX, and instead sending up a non-V as a sacrifice while you place more damage counters; it isn’t the most effective strategy against an [card name=”Umbreon VMAX” set=”Evolving Skies” no=”95″ c=”name”][/card] deck, but it can occasionally work. Keep that play in mind as well when playing against similar matchups. If you are having trouble with this deck (or similar OHKO decks), one thing you can do is to add a copy of [card name=”Big Charm” set=”Sword and Shield” no=”158″ c=”name”][/card] to your deck, as this will get Inteleon VMAX out of KO range in most cases.
Vs. Rapid Strike Urshifu VMAX
[card name=”Rapid Strike Urshifu VMAX” set=”Battle Styles” no=”88″ c=”name”][/card] can always make things awkward if it KOs two of your Basic Pokemon when going first, but as long as you can get past that point, this matchup isn’t a terrible one. [card name=”Cheryl” set=”Battle Styles” no=”123″ c=”name”][/card] is exceptional against this deck, as they don’t pressure a ton of damage. What can be obnoxious is that your opponent can make sure you never keep an [card name=”Octillery” set=”Battle Styles” no=”37″ c=”name”][/card] in play, which opens you up to some inconsistency from [card name=”Marnie” set=”Sword and Shield” no=”169″ c=”name”][/card]. As such, this is a matchup where I might actually attach Water Energy to my Inteleon VMAX and attack that way; this gives you more outs for if your opponent does go with a disruption strategy. Basculin is good in this matchup too, since Rapid Strike Urshifu VMAX has 330 HP, not 320. Other than that, this matchup won’t vary too much from other ones, and so you’ll still want to stick with your general 2HKO strategy.
Vs. Suicune V
The [card name=”Suicune V” set=”Evolving Skies” no=”31″ c=”name”][/card] matchup is probably one of the best examples of how Inteleon VMAX’s strategy is supposed to work. In this matchup, your opponent is going to try to damage you with efficient attacks that don’t quite get a OHKO, while you are going to attack with G-Max Spiral and use [card name=”Inteleon” set=”Chilling Reign” no=”43″ c=”name”][/card] to get their Pokemon into KO range (or finish off a damaged Pokemon).
Against Suicune V, the way to win is to use Cheryl over and over again to stop them from getting Knock Outs. While you can’t OHKO Suicune V yourself, if you can make your opponent attack eight+ times to get the KOs they need, that will buy you plenty of time to get your own Knock Outs. As for your Quick Shooting Inteleon, it’s important to get at least two of them into play, so that you can place six damage counters per turn. Over two turns, this actually does allow you to get Suicune V into OHKO range, which is a big advantage. More importantly, it allows you to KO [card name=”Lotad” set=”Evolving Skies” no=”32″ c=”name”][/card] the second that it hits the field, which will ideally prevent your opponent from ever being able to evolve into [card name=”Ludicolo” set=”Evolving Skies” no=”34″ c=”name”][/card]. With Ludicolo, your opponent can OHKO Inteleon VMAX, which will make winning much tougher.
If your opponent is instead playing the [card name=”Ice Rider Calyrex VMAX” set=”Chilling Reign” no=”46″ c=”name”][/card] variant of Suicune V, then that isn’t as much of a concern. Against that build, you’ll want to put your damage onto their Suicune V whenever possible, as it takes more Ability hits to bring the Suicune V into KO range than the Ice Rider Calyrex into 2HKO range. Try to avoid putting any damage on [card name=”Sobble” set=”Chilling Reign” no=”41″ c=”name”][/card] or [card name=”Drizzile” set=”Sword and Shield” no=”56″ c=”name”][/card] if possible, as that tends to be wasted. The only exception is if you can KO a Sobble that turn by using three Abilities, as that tends to be worth it both for the Prize and the impact to your opponent’s consistency (since they’ll have one less Drizzile to use). Against similar matchups, such as [card name=”Zacian V” set=”Sword and Shield” no=”138″ c=”name”][/card], the strategy is exactly the same: use Cheryl as often as you can. So long as you don’t brick, you should be able to win these easily enough.
Vs. Leafeon VMAX
[cardimg name=”Leafeon VMAX” set=”Evolving Skies” no=”205″ align=”right” c=”none”][/cardimg]
Similar to the Suicune V matchup, the [card name=”Leafeon VMAX” set=”Evolving Skies” no=”8″ c=”name”][/card] is a good stand-in for most opposing VMAX decks that can’t OHKO you. In this case, Leafeon VMAX is limited to a max damage output of 240 + Quick Shooting damage — a lot, but not enough to KO an Inteleon VMAX. Against decks like this, you’ll have to win by KOing two VMAXs, as opposed to three Vs like against Suicune V, but the strategy is mostly the same; set up a big board, use Cheryl over and over, and set up 2HKOs. If your opponent can’t KO you, that’s going to be your go-to strategy.
In the case of Leafeon VMAX, you can also increase your advantage by being clever with your counter-Stadium play. In order to increase their damage, Leafeon VMAX decks need to have [card name=”Galar Mine” set=”Rebel Clash” no=”160″ c=”name”][/card] in play, which you can bump off with [card name=”Training Court” set=”Rebel Clash” no=”169″ c=”name”][/card]. If you can manage to get your [card name=”Tower of Waters” set=”Battle Styles” no=”138″ c=”name”][/card] to be the last Stadium out, then your opponent’s Grass Knot damage will drop to zero, and your opponent will be forced to get by with their other attacks. Other than that, stick with the general strategy, and things should go well.
Vs. Jolteon VMAX
Finally, I do want to bring up Inteleon VMAX’s other popular bad matchup; [card name=”Jolteon VMAX” set=”Evolving Skies” no=”51″ c=”name”][/card]. The trouble here is that Max Thunder Rumble can 2HKO Inteleon VMAX, which gives it a bit of an advantage compared to similar Bench-damaging decks. Like [card name=”Rapid Strike Urshifu VMAX” set=”Battle Styles” no=”88″ c=”name”][/card], Jolteon VMAX will OHKO a Bench Pokemon with every attack, which both gives them easy Prizes and can make it difficult to set up. Unlike Rapid Strike Urshifu VMAX, however, this can be immediately followed up with a KO on Inteleon VMAX if you don’t use [card name=”Cheryl” set=”Battle Styles” no=”123″ c=”name”][/card]. On top of that, Jolteon VMAX can also play Cheryl, which makes surviving the Prize trade even more difficult.
In practice, this matchup tends to feel sort of like you’re playing a mirror match, except that your opponent is better than you at everything. Not exactly fun! You can win if you’re able to out-trade your opponent with 2HKOs, but that can be tough to do, especially if you lose your Drizzile early. Make sure to prioritize putting damage on their [card name=”Jolteon V” set=”Evolving Skies” no=”177″ c=”name”][/card], and in getting as many Sobble in play as possible; this is the one matchup where I might recommend going for [card name=”Inteleon” set=”Chilling Reign” no=”43″ c=”name”][/card] before [card name=”Octillery” set=”Battle Styles” no=”37″ c=”name”][/card]. Otherwise, you can get into a situation where you don’t have an Inteleon in play, at which point you won’t even be able to get a 2HKO.
Outlook for Inteleon VMAX
When it comes down to it, the future success of Inteleon VMAX is likely to depend on how the meta develops. If Single Strike decks or Jolteon VMAX remain dominant, then Inteleon VMAX is likely to have difficulty getting a foothold; on the other hand, if Single Strike fades a bit, and decks that cannot OHKO Inteleon VMAX become a larger part of the meta, then Inteleon VMAX will likely do quite well.
If you’re a player who switches decks often, Inteleon VMAX is a good counter-meta deck to keep around, as it is stellar into the right matchups. With that said, it does have some weaknesses, so you can find yourself in trouble with it if the matchup spread isn’t as favorable.
Overall, I would recommend at least giving it a try, as it’s a pretty good deck!
With that, we’ve come to the end of this article! As always, if you have any questions, don’t hesitate to message me, ask me in the comments, or ask all of us writers in our PTCG Subscriber’s Hideout! Best of luck, and stay safe!
Thanks for reading!
[/premium]