
The Lost Zone is Back! — My Favorite Mirage Gate Decks
Hello again everyone! The new season is now upon us, and after an exciting World Championships, I, like many of you, am ready to get down to business and try and get that invite to Yokohama!
The first Regional Championships are right around the corner, in which we’ll see our last event of the Astral Radiance format, and our first glimpse of the new Lost Origin format. The first Regional Championships awkwardly falls right before Lost Origin becomes legal for tournament play, so it will be roughly the same as the North America International Championships and the World Championships. At this point, the Astral Radiance format has had quite a bit of play, so I’m not going to go over it in this article; instead, I would recommend taking a look at the World Championship results, and checking out some of the PokeBeach articles over that format. Rather than keep rehashing things, I’m instead going to share some of my insight into the Lost Origin format, which will be our tournament format for the Peoria Regional Championships and onward.
In the equivalent Japanese Lost Origin format, you see some of the same decks from Worlds at the top of the meta — namely, [card name=”Origin Forme Palkia VSTAR” set=”Astral Radiance” no=”40″ c=”name”][/card] and [card name=”Mew VMAX” set=”Fusion Strike” no=”114″ c=”name”][/card] — along with a few new options from Lost Origin. Of the new decks, some of the most successful have been decks built around using the new Mirage Gate card. Mirage Gate is incredibly good once it’s able to be used, as the Energy acceleration it provides is some of the best we’ve ever seen from an Item card. The card is rather reminiscent of [card name=”Beast Ring” set=”Forbidden Light” no=”102″ c=”name”][/card], except that it can be used on anything, and can be used throughout the game, not just in a small window. While you do have to build your engine around getting cards in the Lost Zone in order to use Mirage Gate, you aren’t limited beyond that. That is, the kinds of Pokemon you can use with this card are incredibly versatile. In this article, I’ll be going over some of my favorite Mirage Gate-based decks, as well as over how I like to build a deck that uses the Mirage Gate engine.
The Mirage Gate Core
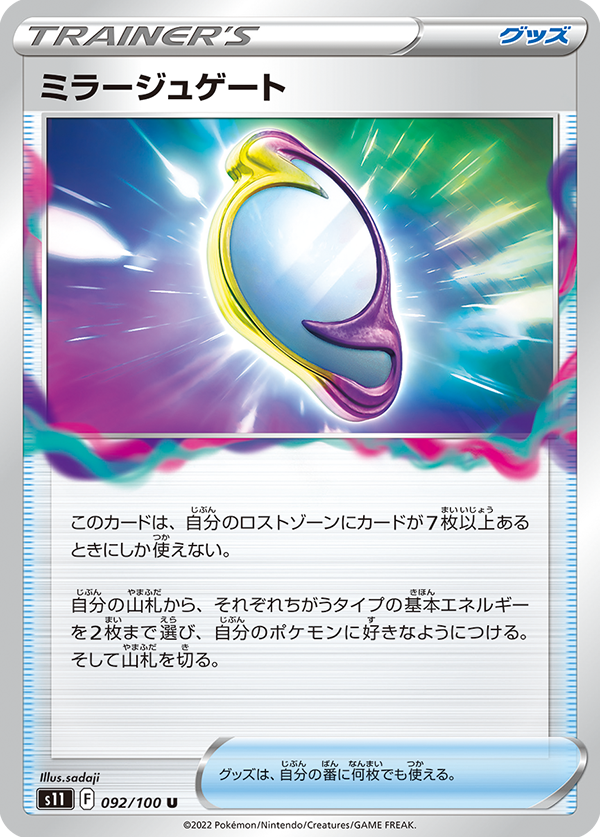 Before you can think about which Pokemon you want to use in a Mirage Gate deck, it’s important to have a strong foundation for getting things into the Lost Zone. After all, if you can’t actually get seven cards in the Lost Zone quickly, you’ll be too far behind for your Mirage Gate Energy acceleration to make up the difference. Luckily, it isn’t all that difficult to actually pull this off. There are three key cards that you’ll want to have in any Mirage Gate deck: Comfey, Colress’s Experiment, and Lost Vacuum.
Comfey is the same as Amazing Rare [card name=”Jirachi” set=”Vivid Voltage” no=”119″ c=”name”][/card], but instead of putting the card you don’t want back on top of your deck, you put it into the Lost Zone. By using Comfey — and repeatedly re-using it with [card name=”Scoop Up Net” set=”Rebel Clash” no=”165″ c=”name”][/card] — not only will you have a bit of a consistency boost, but you’ll also be able to quickly get cards into the Lost Zone. Colress’s Experiment will be your main draw Supporter in any of these decks; it’s a bit like [card name=”Sage’s Training” set=”Undaunted” no=”77″ c=”name”][/card] or [card name=”Hapu” set=”Unified Minds” no=”200″ c=”name”][/card], but again, the cards you don’t pick go to the Lost Zone. In addition to adding two cards to the Lost Zone each time you use it, Colress’s Experiment is actually a pretty strong draw Supporter, to the point that you won’t feel like you’re at a disadvantage when you have to use it instead of, say, [card name=”Marnie” set=”Sword and Shield” no=”169″ c=”name”][/card]. Between Comfey and Colress’s Experiment, you’ll have the basis for a good consistency engine, which also gets you plenty of cards into the Lost Zone quickly. If you go second, and use Flower Selecting and Colress’s Experiment each turn, you’ll have six cards in the Lost Zone by turn 2, and that’s without having to use multiple Comfey. Even when going first, these two cards get you your first four into the Lost Zone, so you don’t have to do too much more to get to the point where you can use Mirage Gate.
To help shore things up, we also have our third key card: Lost Vacuum. It may not be immediately obvious how good this card is, but after playing with it a few times, you’ll see why I like it so much in this Lost Zone engine. What Lost Vacuum does is that it acts as a quick +2 to your Lost Zone stack. The trick here is that you rarely want to get rid of your opponent’s card with it; instead, you want to target either one of your Tools or your Stadium. That way, not only do you add a card into your Lost Zone by playing the Lost Vacuum, but you’ll also put that Tool or Stadium card in the Lost Zone. With that extra boost, it isn’t difficult at all to get to the seven cards you need to use Mirage Gate, even when you’re going first and can’t use Colress’s Experiment back to back.
In every Mirage Gate deck I’ve built, I’ve made sure to include four Comfey, four Colress’s Experiment, and two Lost Vacuum, as well as the four Mirage Gate. Aside from those, I’d recommend playing multiple Scoop Up Net (either three or four) so that you can easily use Comfey multiple times, as well as some [card name=”Air Balloon” set=”Sword and Shield” no=”156″ c=”name”][/card] (typically two or three) so that you can retreat your Comfey. Other than that, there isn’t anything that you need to have in a Mirage Gate deck — you can focus the rest of your list around whatever Pokemon that you’re building around. One of the best parts about Mirage Gate is you can use it on any Pokemon, so you aren’t limited at all in that regard. In theory, every Pokemon in the game can take advantage of this engine, it’s just a question of which Pokemon is the best.
[premium]
Mirage Gate Decks
When it comes to figuring out what Pokemon to build around when using the Mirage Gate acceleration engine, there are a few criteria that I like to focus on to help narrow things down from, well, everything. First, you don’t want to build around a Pokemon that already has strong Energy acceleration, or doesn’t have Energy acceleration as a need. Mirage Gate is certainly good, but it isn’t worth the space if the Pokemon in question doesn’t actually need to use it to be successful. For example, [card name=”Arceus VSTAR” set=”Brilliant Stars” no=”123″ c=”name”][/card] already can attack by turn 2, and has a lot of Energy acceleration for the later game, so it wouldn’t make much sense to put in a bunch of Mirage Gate-focused cards, when you could put in other useful cards instead. There are some instances where you can replace Arceus with the Mirage Gate package, but which is better will be on a deck-by-deck basis. Second, you don’t want to build around anything that requires a lot of Energy of a single type, since Mirage Gate requires you to get two different types of Energy. A deck like [card name=”Origin Forme Dialga VSTAR” set=”Astral Radiance” no=”114″ c=”name”][/card] certainly has a need for Energy acceleration, but since it needs all of those Energy to be Metal Energy, Mirage Gate won’t get the job done. Instead, Mirage Gate is best in a multi-type deck, or on Pokemon that only require one type of Energy plus Colorless Energy. Finally, you’ll want to make sure that the Pokemon you are building around is strong enough to actually be worth building around. Most of the time, that determination will come from testing, but in general, this means to look at the strongest options that exist that can meet the previous two criteria. Look for Pokemon with high damage output, or with unique secondary effects that can lead to victory.
With that, let’s take a look at a few different Mirage Gate decks that I’ve been playing.
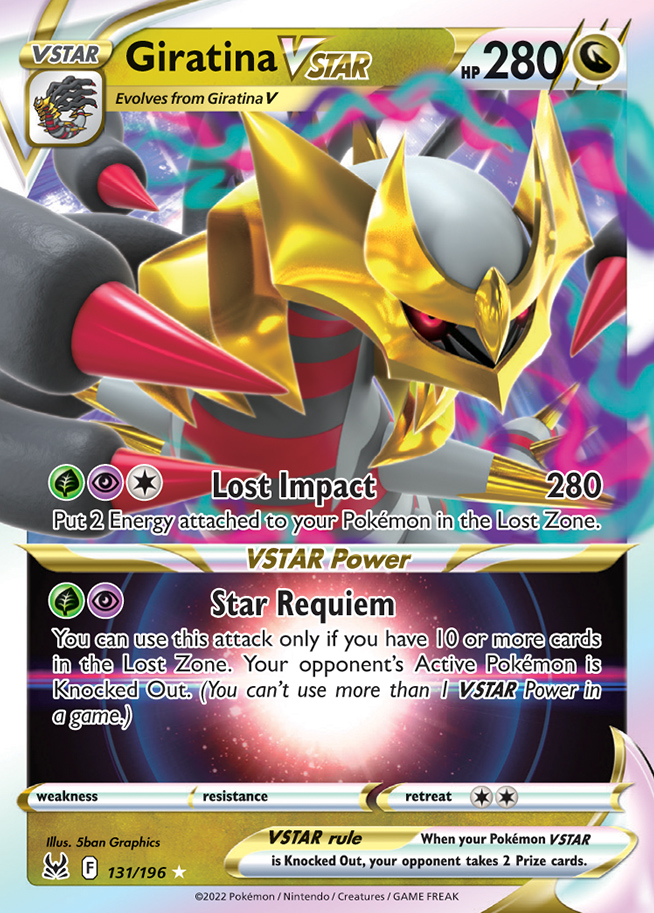
Giratina VSTAR
This isn’t the only Pokemon to utilize the Mirage Gate engine, but Giratina VSTAR is the most popular, and for good reason. In our current Pokemon VSTAR-heavy format, 280 damage is an extremely important number to be able to hit for. Lost Impact can OHKO any Pokemon VSTAR, and with a [card name=”Choice Belt” set=”Brilliant Stars” no=”135″ c=”name”][/card], it can also OHKO [card name=”Mew VMAX” set=”Fusion Strike” no=”114″ c=”name”][/card], or any Pokemon VSTAR that happens to play [card name=”Big Charm” set=”Sword and Shield” no=”158″ c=”name”][/card]. On top of that, Giratina’s VSTAR attack is ridiculously good — by definition, it KOs everything! Once you get to the point where you can use Mirage Gate, you should be able to win the game within three turns, every time. The damage output isn’t the only important thing here though. The other big advantage that Giratina VSTAR has when it comes to interacting with Mirage Gate is that Giratina itself can put cards into the Lost Zone, which makes it a lot easier to get to that number of seven in the Lost Zone. The synergy here is quite impressive, and it makes the deck a lot faster, and a lot more consistent. In Japan, Giratina VSTAR has been the best performing Mirage Gate deck, and I would expect it to be the Mirage Gate deck that players focus on the most heading into the Peoria Regional Championships.
There are a lot of lists going around of Giratina VSTAR right now; I would expect that as players continue to refine them, this deck will get quite a bit better. Even now, I would consider this archetype to be able to compete with the top decks in the Standard meta, though I wouldn’t quite yet put it at the level of [card name=”Origin Forme Palkia VSTAR” set=”Astral Radiance” no=”40″ c=”name”][/card] in terms of competitiveness. With that said, it is close, and it has the potential to reach that level in the future. Here is my current list for Giratina VSTAR:
[decklist name=”Giratina VSTAR” amt=”60″ caption=”Giratina” cname=”Leafeon VSTAR” set=”Sword and Shield Black Star Promos” no=”SWSH195 “][pokemon amt=”16”]3x Giratina VSTAR (#SWSH11 #131)3x Giratina V (#SWSH11 #130)4x Comfey (#SWSH11 #79)1x [card name=”Leafeon VSTAR” set=”Sword and Shield Black Star Promos” no=”SWSH195 ” c=”deck2″ amt=”1″][/card]1x [card name=”Leafeon V” set=”Evolving Skies” no=”7″ c=”deck2″ amt=”1″][/card]1x Cramorant (#SWSH11 #50)1x Radiant Gardevoir (#SWSH11 #69)1x [card name=”Crobat V” set=”Darkness Ablaze” no=”104″ c=”deck2″ amt=”1″][/card]1x [card name=”Lumineon V” set=”Brilliant Stars” no=”40″ c=”deck2″ amt=”1″][/card][/pokemon][trainers amt=”32″]4x Colress’s Experiment (#SWSH11 #155)2x [card name=”Boss’s Orders” set=”Rebel Clash” no=”154″ c=”deck2″ divide=”yes” amt=”2″][/card]4x [card name=”Battle VIP Pass” set=”Fusion Strike” no=”225″ c=”deck2″ amt=”4″][/card]4x [card name=”Quick Ball” set=”Sword and Shield” no=”179″ c=”deck2″ amt=”4″][/card]4x [card name=”Scoop Up Net” set=”Rebel Clash” no=”165″ c=”deck2″ amt=”4″][/card]4x Mirage Gate (#SWSH11 #163)3x [card name=”Ultra Ball” set=”Brilliant Stars” no=”150″ c=”deck2″ amt=”3″][/card]2x Lost Vaccuum (#SWSH11 #162)2x [card name=”Air Balloon” set=”Sword and Shield” no=”156″ c=”deck2″ amt=”2″][/card]1x [card name=”Choice Belt” set=”Brilliant Stars” no=”135″ c=”deck2″ divide=”yes” amt=”1″][/card]2x [card name=”Stormy Mountains” set=”Evolving Skies” no=”161″ c=”deck2″ amt=”2″][/card][/trainers][energy amt=”12″]6x [card name=”Grass Energy” set=”HeartGold and SoulSilver” no=”115″ c=”deck2″ amt=”6″][/card]6x [card name=”Psychic Energy” set=”HeartGold and SoulSilver” no=”119″ c=”deck2″ amt=”6″][/card][/energy][/decklist]
To start things off, you have the Mirage Gate core I talked about above, along with a 3-3 line of the Giratina VSTAR. To make our setup a bit more efficient, we also have both [card name=”Crobat V” set=”Darkness Ablaze” no=”104″ c=”name”][/card] and [card name=”Lumineon V” set=”Brilliant Stars” no=”40″ c=”name”][/card]; these make it a bit easier to find our Colress’s Experiment, which likewise increases our chances of getting to use Mirage Gate early. The Cramorant is in here as a way to provide pressure in situations where you don’t necessarily want to use Giratina VSTAR, or are still in the process of setting it up. If your opponent has a non-Pokemon V in the Active Spot early on, such as [card name=”Meloetta” set=”Fusion Strike” no=”124″ c=”name”][/card] for example, Cramorant gives you a way to deal with that without giving your opponent an easy opportunity to damage your Pokemon Vs or VSTARs. If you do have to take a Knock Out on a non-Pokemon V, you’ll be pushed to an uneven Prize trade, but if you can take that Knock Out with a non-Pokemon V yourself, then you can put your opponent in a position where they may have to match you.
For my Radiant Pokemon, I’ve chosen to use Radiant Gardevoir in this deck instead of [card name=”Radiant Greninja” set=”Astral Radiance” no=”46″ c=”name”][/card]. Radiant Gardevoir is a Pokemon that I think could end up being under the radar, and if your opponent isn’t prepared for it, it will win you games. Radiant Greninja is great, for sure, but this deck tends to have a need to conserve its Energy, and so it was somewhat rare that I would actually be able to use the Concealed Cards Ability more than once without putting myself in a precarious position later on. Radiant Gardevoir, in contrast, can be sneakily good, especially if your opponent doesn’t have a lot of extra room for damage. With Radiant Gardevoir, you hop out of the OHKO range of Giratina VSTAR, Hisuian Zoroark VSTAR, and [card name=”Origin Forme Palkia VSTAR” set=”Astral Radiance” no=”40″ c=”name”][/card], meaning that your opponent will need an additional damage modifier in order to get that OHKO. It isn’t terribly difficult for them to get that — typically, they’ll need either a [card name=”Choice Belt” set=”Brilliant Stars” no=”135″ c=”name”][/card] or a [card name=”Path to the Peak” set=”Chilling Reign” no=”148″ c=”name”][/card] (to shut off Radiant Gardevoir) — but you will force them to use up extra resources to do so. Over the course of a match, having Radiant Gardevoir on the field can eventually lead to them missing a Knock Out, which typically is enough to get you into the lead.
An extremely important piece of this list that I haven’t mentioned yet is the [card name=”Leafeon V” set=”Evolving Skies” no=”7″ c=”name”][/card]. By using Greening Cells, you can start the game off with two Energy attachments — which means that you can actually attack with Giratina VSTAR on turn 2, even without Mirage Gate. That’s incredibly important, as it means that you don’t actually have to wait until your Mirage Gate is usable to start taking Knock Outs; instead, you can do so immediately. Since Lost Impact puts two Energy into the Lost Zone, you’ll typically be able to follow up that turn 2 attack with some Mirage Gate acceleration and an immediate second attack, followed by a VSTAR attack for the win on the following turn. When this deck is running well, it is as dangerous as anything else in the game, specifically due to that potential early Knock Out pressure. You can also use [card name=”Zacian V” set=”Celebrations” no=”16″ c=”name”][/card] to play the same role, but by using Leafeon V, we also get to play [card name=”Leafeon VSTAR” set=”Sword and Shield Black Star Promos” no=”SWSH195 ” c=”name”][/card]. Star Requiem is certainly a good VSTAR Power, but given how much damage you do with Lost Impact, there are quite a few games where it isn’t necessary to use it. In those games, having a second option in Ivy Star can be critical. Leafeon VSTAR also isn’t a bad secondary attacker, and can be particularly useful in matches against non-Pokemon V decks, where you can otherwise run into Energy trouble if you are forced to use Lost Impact more than three times.
In this list, I’ve put a heavy emphasis on the deck’s early-game setup, particularly when it comes to finding your Basic Pokemon. I’m a big fan of [card name=”Battle VIP Pass” set=”Fusion Strike” no=”225″ c=”name”][/card] in any deck where you have a need to find a bunch of Basic Pokemon early, and have a way to help dig through the deck a bit to increase your odds of being able to use them. In this case, Comfey helps us dig a bit further, and it’s rather important to find both Giratina V and Leafeon V early (when going first), so the deck has the need for that additional search. To further help, I’ve also included two copies of [card name=”Stormy Mountains” set=”Evolving Skies” no=”161″ c=”name”][/card] as the Stadium in this deck, so that you have even more outs for your Giratina V. If you do decide to play Radiant Greninja instead of Radiant Gardevoir, I would recommend switching those over to [card name=”Training Court” set=”Rebel Clash” no=”169″ c=”name”][/card], but in this list, the Stormy Mountains can be a bit more useful. The Supporters in this deck are few in number, but realistically, you don’t need to use many in this deck, especially when you have the extra cards from Comfey. Between the four Colress’s Experiment, the Crobat V, and the Lumineon V, there’s more than enough draw power in this deck to get you through the game. On the plus side, this means you can fit in more cards to focus on the earlier part of the game, though there can be times later in the game where you aren’t doing much aside from attacking. As I’ve said though, this deck should win quickly after it starts attacking, so you don’t have a large need for late-game draw Supporters. When it comes to your Energy, I would recommend sticking to at least this number; any less, and you can get into some trouble, especially if you have to put any into the Lost Zone when using Flower Selecting or Colress’s Experiment.
How you approach games with this deck will vary on whether you are going first or second. If you’re going first, then your top priority will be to find Giratina V and Leafeon V, so that you can put yourself in a position to attack with Lost Impact on your second turn. When going first, you’re going to be a bit slower putting stuff into the Lost Zone (since you can’t use Colress’s Experiment on turn 1), but if you can attack turn 2, then that should make up the difference. This deck tends to win a lot when it can take the first Prizes, due to how strong the OHKO gameplan is. Likewise, if you can use Leafeon V on turn 1 and Lost Impact on turn 2, you should be able to win that match most of the time.
If you go second however, you shouldn’t focus on the Leafeon V play, and should instead prioritize getting cards into the Lost Zone. You’ll also want to try to make sure you have two Giratina V in play, so that if one does get Knocked Out, you can still evolve and attack with the other one. If you do go after the Leafeon play, and they can gust up and KO the energized Giratina, then your game can quickly fall apart. On the other hand, if you can get into a position where you can use Mirage Gate right away, then you’ll have a fighting chance even if the opponent can get that dreaded turn 2 KO. Cramorant can be a good early attacker when going second, especially if you can Knock Out a [card name=”Sobble” set=”Chilling Reign” no=”41″ c=”name”][/card] or other important Basic Pokemon with it. The other option you have is to use Giratina V’s Abyss Seeker attack, which is effectively another Colress’s Experiment. If your opponent is in a position where they can’t threaten the turn 2 Knock Out, then Abyss Seeker is a great play. You can also opt to use Leafeon V in this scenario, though Abyss Seeker can actually be stronger if you need the extra draw power, and are confident you can use Mirage Gate on the following turn.Once you do start using Giratina VSTAR, then the gameplan for this deck is rather straightforward: get OHKOs on your opponent’s Pokemon Vs and VSTARs, and win the game with a few attacks.
Amazing Reshiram (And Friends)
Amazing Rares have always been, well, amazing, but they’ve had a big limitation in the difficulty of their attack costs. The multi-color aspect of Mirage Gate naturally works well as a solution to this problem, and thus opens up the Amazing Rare Pokemon to competitive use. Of the Amazing Rares, [card name=”Reshiram” set=”Shining Fates” no=”17″ c=”name”][/card] has been the best one to build around with Mirage Gate. Reshiram has incredible damage output, as it’s easily capable of OHKOing any Pokemon VSTAR, as well as Mew VMAX. You basically get the same damage threat as you would with Giratina VSTAR, except in this deck, you’re attacking with a basic single Prize Pokemon, not a Pokemon VSTAR. As with Giratina, you should win by attacking three times into most decks, but since you only give up one Prize at a time, you have a bit longer to get to the point where you can attack. Here’s my list for Amazing Reshiram:
[decklist name=”Reshiram Amazing” amt=”60″ caption=”Reshiram” cname=”Reshiram” set=”Shining Fates” no=”17″][pokemon amt=”12″]3x [card name=”Reshiram” set=”Shining Fates” no=”17″ c=”deck2″ amt=”3″][/card]4x Comfey (SWSH11 #79)1x [card name=”Radiant Charizard” set=”Pokemon GO” no=”11″ c=”deck2″ amt=”1″][/card]1x [card name=”Yveltal” set=”Shining Fates” no=”46″ c=”deck2″ amt=”1″][/card]1x Cramorant (SWSH11 #50)1x [card name=”Moltres” set=”Pokemon GO” no=”12″ c=”deck2″ amt=”1″][/card]1x [card name=”Manaphy” set=”Brilliant Stars” no=”41″ c=”deck2″ amt=”1″][/card][/pokemon][trainers amt=”35″]4x Colress’s Experiment (SWSH11 #155)2x [card name=”Boss’s Orders” set=”Rebel Clash” no=”154″ c=”deck2″ amt=”2″][/card]2x [card name=”Raihan” set=”Evolving Skies” no=”152″ c=”deck2″ amt=”2″][/card]1x [card name=”Ninja Boy” set=”Steam Siege” no=”103″ c=”deck2″ amt=”1″][/card]1x [card name=”Klara” set=”Chilling Reign” no=”145″ c=”deck2″ divide=”yes” amt=”1″][/card]4x Mirage Gate (SWSH11 #163)4x [card name=”Quick Ball” set=”Sword and Shield” no=”179″ c=”deck2″ amt=”4″][/card]3x [card name=”Scoop Up Net” set=”Rebel Clash” no=”165″ c=”deck2″ amt=”3″][/card]2x [card name=”Ultra Ball” set=”Brilliant Stars” no=”150″ c=”deck2″ amt=”2″][/card]2x [card name=”Choice Belt” set=”Brilliant Stars” no=”135″ c=”deck2″ amt=”2″][/card]2x Lost Vaccuum (SWSH11 #162)2x [card name=”Air Balloon” set=”Sword and Shield” no=”156″ c=”deck2″ amt=”2″][/card]1x [card name=”Fog Crystal” set=”Chilling Reign” no=”140″ c=”deck2″ amt=”1″][/card]1x [card name=”Hisuian Heavy Ball” set=”Astral Radiance” no=”146″ c=”deck2″ amt=”1″][/card]1x [card name=”Ordinary Rod” set=”Sword and Shield” no=”171″ c=”deck2″ divide=”yes” amt=”1″][/card]3x [card name=”Magma Basin” set=”Brilliant Stars” no=”144″ c=”deck2″ amt=”3″][/card][/trainers][energy amt=”13″]4x [card name=”Fire Energy” set=”HeartGold and SoulSilver” no=”116″ c=”deck2″ amt=”4″][/card]3x [card name=”Lightning Energy” set=”HeartGold and SoulSilver” no=”118″ c=”deck2″ amt=”3″][/card]3x [card name=”Darkness Energy” set=”HeartGold and SoulSilver” no=”121″ c=”deck2″ amt=”3″][/card]1x [card name=”Psychic Energy” set=”HeartGold and SoulSilver” no=”119″ c=”deck2″ amt=”1″][/card]1x [card name=”Aurora Energy” set=”Sword and Shield” no=”186″ c=”deck2″ amt=”1″][/card]1x [card name=”Twin Energy” set=”Rebel Clash” no=”174″ c=”deck2″ amt=”1″][/card][/energy][/decklist]
[cardimg name=”Reshiram” set=”Shining Fates” no=”17″ align=”right” c=”none”][/cardimg]
Your main attackers in this deck are the Reshiram, but I also have Amazing Rare [card name=”Yveltal” set=”Shining Fates” no=”46″ c=”name”][/card] and [card name=”Radiant Charizard” set=”Pokemon GO” no=”11″ c=”name”][/card] as alternate attackers. Radiant Charizard gives this deck a secondary attacker in the late-game, one which can be used even if the Mirage Gate stuff isn’t going all that well. Between the [card name=”Klara” set=”Chilling Reign” no=”145″ c=”name”][/card], the [card name=”Ordinary Rod” set=”Sword and Shield” no=”171″ c=”name”][/card], and the Thorton, you can re-use Radiant Charizard up to three times, which is enough to win even if you’re never actually able to attack with Reshiram. This aspect of the deck makes it a good bit less fragile, and lets you play around some of the downsides of Reshiram more easily. Yveltal can be used to KO tankier Pokemon, and is specifically useful in that it gives this deck a way to OHKO [card name=”Flying Pikachu VMAX” set=”Celebrations” no=”7″ c=”name”][/card]. With Mirage Gate, [card name=”Raihan” set=”Evolving Skies” no=”152″ c=”name”][/card], and [card name=”Magma Basin” set=”Brilliant Stars” no=”144″ c=”name”][/card], it’s surprisingly easy to power up Yveltal. You can do so either with [card name=”Twin Energy” set=”Rebel Clash” no=”174″ c=”name”][/card] + Mirage Gate + Raihan, Twin Energy + Mirage Gate + Magma Basin + Thornton, or simply with two Mirage Gate and an Energy. Cramorant is again a useful attacker in the early game to apply pressure, and is also quite nice to have in matchups against other non-Pokemon V decks. Finally, the [card name=”Moltres” set=”Pokemon GO” no=”12″ c=”name”][/card] is a great card in here, that’s rather critical to the deck’s success against most meta decks. Moltres bumps up your Amazing Blaze damage to that perfect 280 number, so that you can OHKO Pokemon VSTARs without needing to have Choice Belt or use [card name=”Galarian Zigzagoon” set=”Sword and Shield” no=”117″ c=”name”][/card]. With Choice Belt, you also get Mew VMAX into OHKO range when you have Moltres on the board.
The Trainer line in this deck is fairly similar to the Giratina VSTAR list, but there’s much less emphasis on Pokemon search, and more on Pokemon recovery and extra later-game consistency. The Raihan and Thorton help to keep things flowing from attacker to attacker, and make it rather easy to keep using Reshiram or Radiant Charizard even when you’re getting Knocked Out every turn. Being able to Raihan for a Mirage Gate is definitely a strong play! For our Stadium, we use Magma Basin in this deck; again, this is to give us even more Energy acceleration, and to let us go from Pokemon to Pokemon easier. Between Magma Basin and Raihan, you can actually pull off repeated attacks even without Mirage Gate — it’s just another avenue to being able to do so. Our Energy is a bit wonky, as we have six different kinds (including four different types of Basic Energy), but it all works out pretty well. The one Psychic Energy is needed for Yveltal, but can also be grabbed with [card name=”Fog Crystal” set=”Chilling Reign” no=”140″ c=”name”][/card] if you need it for Radiant Charizard or to retreat. The Twin Energy helps both Radiant Charizard and Yveltal, while the [card name=”Aurora Energy” set=”Sword and Shield” no=”186″ c=”name”][/card] helps us to have a bit of an easier time with all of these different types.
With this deck, you aren’t going to be as focused early on setting up for a turn 2 attack, so much as you are on getting seven cards into the Lost Zone. With that said, you actually can get to that turn 2 attack rather easily with Magma Basin and Raihan, so it is a good play to try to find one Reshiram, and attach an Energy to it (preferably non-Fire). If you can take any Prizes early on, that will make the rest of the game much easier, though if you do so at the expense of getting cards in the Lost Zone, you can end up struggling instead. So, you’ll want to balance the two. Thankfully, it is much easier to focus on the Lost Zone stuff with this deck, since you don’t need to have any Pokemon out early; you aren’t evolving at any point with this deck, so if you don’t get the turn 1 attachment, it isn’t all that bad.
You main goal with this deck is going to be to figure out how to continue to attack (ideally for a multi-prize Knock Out) while you’re getting Knocked Out every turn. A good way to do that in this deck is to make sure you have a few attackers down every turn (so, multiple Reshiram and possibly Radiant Charizard), that way you only need to find the Energy acceleration. If you want, you can use Mirage Gate to set up multiple Reshiram to attack with. [card name=”Marnie” set=”Sword and Shield” no=”169″ c=”name”][/card] is rather popular right now, so you’ll want to use your Mirage Gate whenever you can in most cases, with the idea being that you can set up enough attackers so that your opponent can’t possibly beat your board. The one thing to be wary of when doing so is that your opponent can put you in an awkward spot by gusting around whichever Reshiram you attacked with to hit a different energized Pokemon. Since Reshiram damages itself when it attacks, this can put you in a position where you have to knock yourself out in order to attack with it a second time. You can get around this however, by using Thorton to turn it into Radiant Charizard. Even if you are getting disrupted though, this deck has so many ways to accelerate Energy, that you should be able to find some way to do so and set up another attacker. Overall, your plan is to simply trade OHKOs with your opponent, and win by taking Prizes faster than them, and with how high this deck’s damage output is, it isn’t terribly difficult to pull this off! If the format remains dominated by Pokemon VSTAR decks, then this Amazing Reshiram deck has a bunch of potential, as it trades into those decks with ease. It may be early, but this is already one of my top contenders for Peoria — I certainly recommend giving it a try!
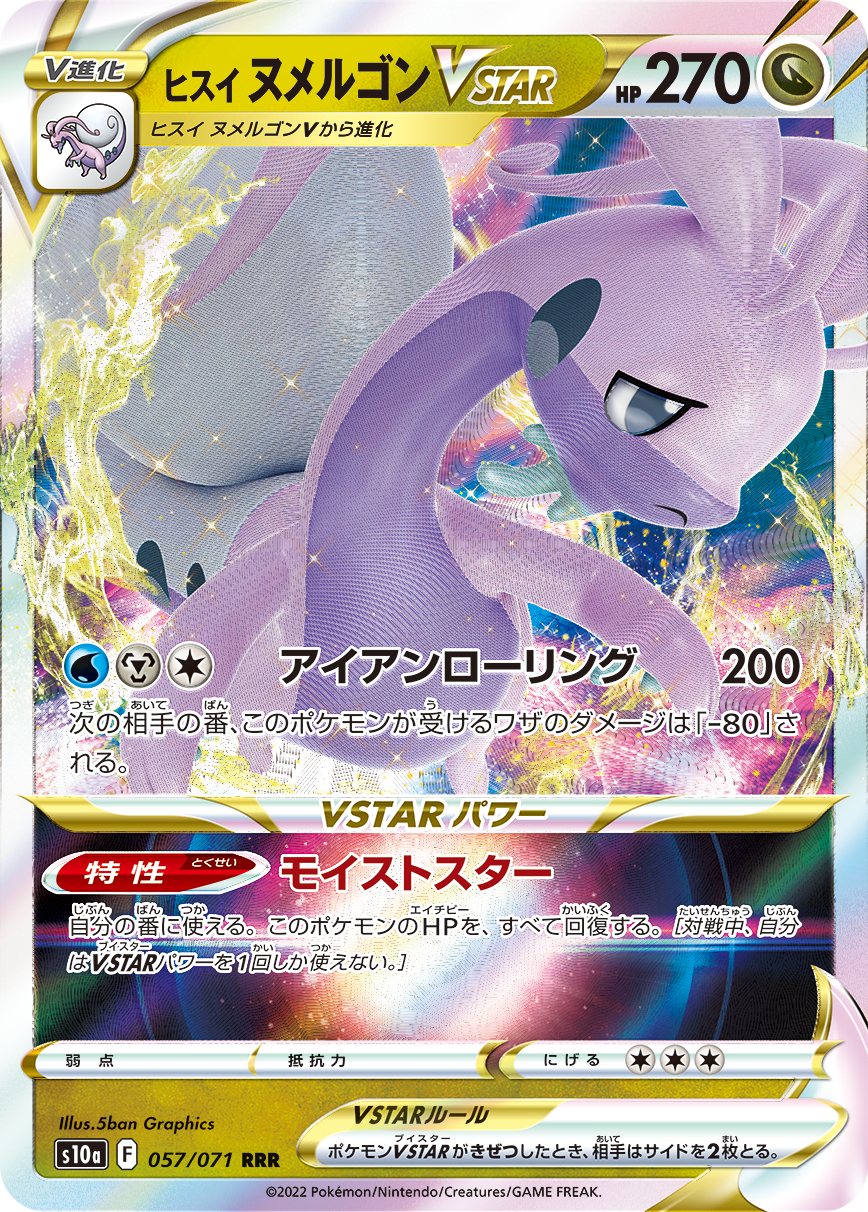
Hisuian Goodra VSTAR
If you want to go for a bit of a different strategy than the aggression of Giratina VSTAR and the Amazing Rares, then you may also want to consider this Hisuian Goodra VSTAR deck. This deck takes advantage of the new Supporter, Fantina, to prevent quite a bit of damage, and then wins by slowly beating down the opponent. Between Iron Rollout and Fantina, you can reduce your opponent’s damage by 200 damage — enough to wither away even the most dangerous attacks. On top of that, you can use Moisture Star to heal off damage if things get close. I will say, it’s quite amusing to force an opponent into a situation where they need five (or more!) attacks to get a single KO… and then to erase four of those attacks with a single Ability. Realistically, so long as you don’t get run down early, you should win most games, so long as you can keep recovering and using your Fantina. This isn’t necessarily a “Mirage Gate” deck, so much as it is a deck that utilizes the Lost Zone (and thus, can make use of Mirage Gate), but it a great use of the Mirage Gate engine, and a great example of how a deck can use that to win, even if its damage output isn’t the highest. Here’s my Goodra VSTAR list:
[decklist name=”Goodra VSTAR” amt=”60″ caption=”Goodra” cname=”Bibarel” set=”Brilliant Stars” no=”121″][pokemon amt=”16″]3x Hisuian Goodra VSTAR (SWSH11 #136)3x Hisuian Goodra V (SWSH11 #135)4x Comfey (SWSH11 #79)1x [card name=”Bibarel” set=”Brilliant Stars” no=”121″ c=”deck2″ amt=”1″][/card]1x [card name=”Bidoof” set=”Brilliant Stars” no=”120″ c=”deck2″ amt=”1″][/card]1x Radiant Gardevoir (SWSH11 #69)1x [card name=”Crobat V” set=”Darkness Ablaze” no=”104″ c=”deck2″ amt=”1″][/card]1x [card name=”Lumineon V” set=”Brilliant Stars” no=”40″ c=”deck2″ amt=”1″][/card]1x [card name=”Eldegoss V” set=”Rebel Clash” no=”19″ c=”deck2″ amt=”1″][/card][/pokemon][trainers amt=”35″]4x Colress’s Experiment (SWSH11 #155)4x Fantina (SWSH11 #157)2x [card name=”Boss’s Orders” set=”Rebel Clash” no=”154″ c=”deck2″ amt=”2″][/card]1x [card name=”Melony” set=”Chilling Reign” no=”146″ c=”deck2″ divide=”yes” amt=”1″][/card]4x [card name=”Quick Ball” set=”Sword and Shield” no=”179″ c=”deck2″ amt=”4″][/card]4x [card name=”Ultra Ball” set=”Brilliant Stars” no=”150″ c=”deck2″ amt=”4″][/card]4x Mirage Gate (SWSH11 #163)4x [card name=”Scoop Up Net” set=”Rebel Clash” no=”165″ c=”deck2″ amt=”4″][/card]2x [card name=”Evolution Incense” set=”Sword and Shield” no=”163″ c=”deck2″ amt=”2″][/card]2x [card name=”Air Balloon” set=”Sword and Shield” no=”156″ c=”deck2″ amt=”2″][/card]2x Lost Vaccuum (SWSH11 #162)2x [card name=”Crystal Cave” set=”Evolving Skies” no=”144″ c=”deck2″ amt=”2″][/card][/trainers][energy amt=”9″]5x [card name=”Water Energy” set=”HeartGold and SoulSilver” no=”117″ c=”deck2″ amt=”5″][/card]4x [card name=”Metal Energy” set=”HeartGold and SoulSilver” no=”122″ c=”deck2″ amt=”4″][/card][/energy][/decklist]
This list is nearly the same as the Giratina VSTAR list, but I use a bit more of a traditional Pokemon search line (no [card name=”Battle VIP Pass” set=”Fusion Strike” no=”225″ c=”name”][/card] here), and also include a small [card name=”Bibarel” set=”Brilliant Stars” no=”121″ c=”name”][/card] line for better late-game consistency. To fit that in, I’ve reduced the Energy count slightly, as you don’t need quite as many when you aren’t putting two into the Lost Zone with every attack! Having [card name=”Eldegoss V” set=”Rebel Clash” no=”19″ c=”name”][/card] also makes it a bit easier to use multiple Colress’s Experiment early on, though you’ll want to save the Eldegoss V for re-using Fantina if you can.
The idea behind this deck is that you want to outlast your opponent by reducing all of their damage, so you need to have a stronger gameplan in that part of the game than you do when using Giratina VSTAR. The early game in this deck is the same — you want to get cards into the Lost Zone as quickly as you can. In this deck however, your goal is to get 10 cards in there, not seven. Once you are at that point, then your goal is to find and use Fantina as often as possible. Every turn you use Fantina is effectively a free turn for you, so the more you can use it, the better your chances of winning. Fantina also protects all of your Pokemon, not just Goodra VSTAR, so you can use your [card name=”Crobat V” set=”Darkness Ablaze” no=”104″ c=”name”][/card], [card name=”Lumineon V” set=”Brilliant Stars” no=”40″ c=”name”][/card], and Eldegoss V in this deck without too much worry.
This isn’t the fastest deck in the world, but once you get established, it’s easy to make comebacks simply due to how much harder it is for your opponent to knock you out. The only real trick is to know when to use Moisture Star; ideally, you want to use this as close as possible to when you will be Knocked Out, as that gives you the best bang for your buck as far as erasing your opponent’s attacks. Try to keep in mind what you’re playing against, and what their absolute maximum damage output is. Be sure to factor in plays like using [card name=”Path to the Peak” set=”Chilling Reign” no=”148″ c=”name”][/card] to shut off Radiant Gardevoir, or using both [card name=”Cross Switcher” set=”Fusion Strike” no=”230″ c=”name”][/card] and [card name=”Boss’s Orders” set=”Rebel Clash” no=”154″ c=”name”][/card] to eliminate the effect of Iron Rollout. Once your opponent is at the point where they might be able to get there, that’s when you want to use Moisture Star. In general, it can be better to use it too soon, rather than too late. Again though, after playing a matchup a bit, you should start to get a feel for when the best time to do so is.
Conclusion
These three decks may be among my favorites, but as I’ve said, there are endless possibilities that you can use with Mirage Gate. If you have any ideas yourself, take my Mirage Gate core, and then definitely try them out!
With that, we’ve come to the end of this article! Thanks for reading, and as always, if you have any questions, don’t hesitate to message me, ask me in the comments, or ask all of us writers in our PTCG Subscriber’s Hideout! Best of luck, and stay safe!
Thanks for reading!
[/premium]
