
Spinning the Web — A First Look at Galvantula ex
Hello everyone! We’re into the beginning of the new season, and we now have our first new set of the season in Stellar Crown, a smaller set which is mostly made up of cards from Japan’s Stellar Miracle set. The release of Stellar Crown will put the Japanese and non-Japanese formats into roughly the same format, though as this has been the off-season in Japan, there are few serious events to base any results on.
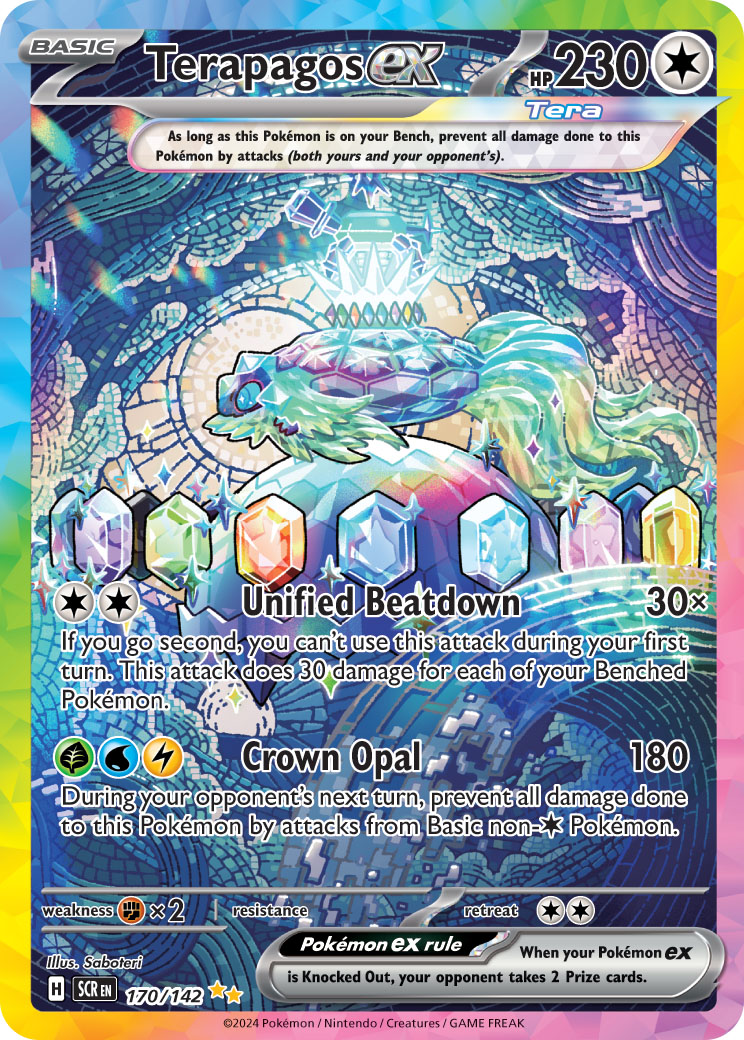
It’s a new year and a relatively unexplored new set! While the set isn’t large, there are a few new cards which will find their way into existing decks, as well as a few new Pokemon which may make up brand-new archetypes. The “theme” of this set is Terapagos and stellar Pokemon, with a particular focus on Colorless Pokemon. Terapagos ex is itself a deck, thanks to the new [card name=”Sky Field” set=”Roaring Skies” no=”89″ c=”name”][/card]-like Stadium Area Zero Underdepths, and it can be played either on its own with some of the new powerful Colorless support Pokemon (like Noctowl and Bouffalant), or with [card name=”Origin Forme Palkia VSTAR” set=”Astral Radiance” no=”40″ c=”name”][/card] as a synergistic secondary attacker. The most notable new card for Colorless Pokemon is Glass Trumpet; an Item that can provide powerful Energy acceleration to Colorless Pokemon, such as Terapagos ex. All you need is a Tera Pokemon in play — which Terapagos ex is — and suddenly Colorless has among the best Energy acceleration in the game!
Here’s the thing though; Glass Trumpet’s usefulness isn’t limited to only Terapagos ex — in fact, it can work well in a variety of decks. Moreover, those decks don’t have to be Colorless-focused decks; instead, by combining Glass Trumpet with [card name=”Blissey ex” set=”Twilight Masquerade” no=”134″ c=”name”][/card], you can effectively turn Glass Trumpet into Energy acceleration for any type! When Blissey ex came out in Twilight Masquerade, it seemed to be the kind of versatile card that should, at some point, find its way into the meta. Now, with Stellar Crown and the new Glass Trumpet, it should start to realize that potential. An extra couple of Energy per turn can be useful in a lot of different decks, but there is one particular new card that the new Glass Trumpet + Happy Switch combo works perfectly with, and that is Galvantula ex.
In this article, I’m going to take a look at Galvantula ex and explain how it works, why it combos so well with Glass Trumpet, and share my decklist for this new archetype.
Unlikely Friends — Galvantula ex & Blissey ex
First, let’s look a bit more at Galvantula ex. Charged Web is a rather efficient attack at two for 220, but what makes this card shine is Fulgurite. It’s been a bit since we had a strong Item lock deck in the format, and Fulgurite is one of the strongest Item-locking attacks ever. Not only does it lock your opponent out of Items on the following turn, but at 180 damage per attack, it doesn’t take long to Knock Out your opponent’s Pokemon either. Unlike something like [card name=”Seismitoad-EX” set=”Furious Fists” no=”20″ c=”name”][/card]’s Quaking Punch, which took a slow-and-steady approach to get KOs, Fulgurite can 2HKO just about anything in the format, including VSTARs and Stage 2 ex Pokemon. As such, you don’t need to play a ton of disrupting Trainers along with it to win — so long as you can keep using Fulgurite, you’ll be victorious before too long. Item lock is a tried and true strategy and one that has been missing from the current format for a bit now. As such, many decks are not built to withstand Item lock; on the contrary, quite a few of the top archetypes overwhelmingly rely on some Item or another. For a few examples, [card name=”Regidrago VSTAR” set=”Silver Tempest” no=”136″ c=”name”][/card] needs [card name=”Energy Switch” set=”Scarlet and Violet” no=”173″ c=”name”][/card], [card name=”Raging Bolt ex ” set=”Temporal Forces” no=”123″ c=”name”][/card] decks need [card name=”Energy Retrieval” set=”Scarlet and Violet” no=”171″ c=”name”][/card] and [card name=”Earthen Vessel” set=”Paradox Rift” no=”163″ c=”name”][/card], [card name=”Miraidon ex” set=”Scarlet and Violet” no=”81″ c=”name”][/card] decks need [card name=”Electric Generator” set=”Scarlet and Violet” no=”170″ c=”name”][/card], and [card name=”Charizard ex” set=”Obsidian Flames” no=”125″ c=”name”][/card] decks need [card name=”Rare Candy” set=”Paldean Fates” no=”89″ c=”name”][/card]. Shut those decks off from their most important Items, and suddenly they become a lot weaker.
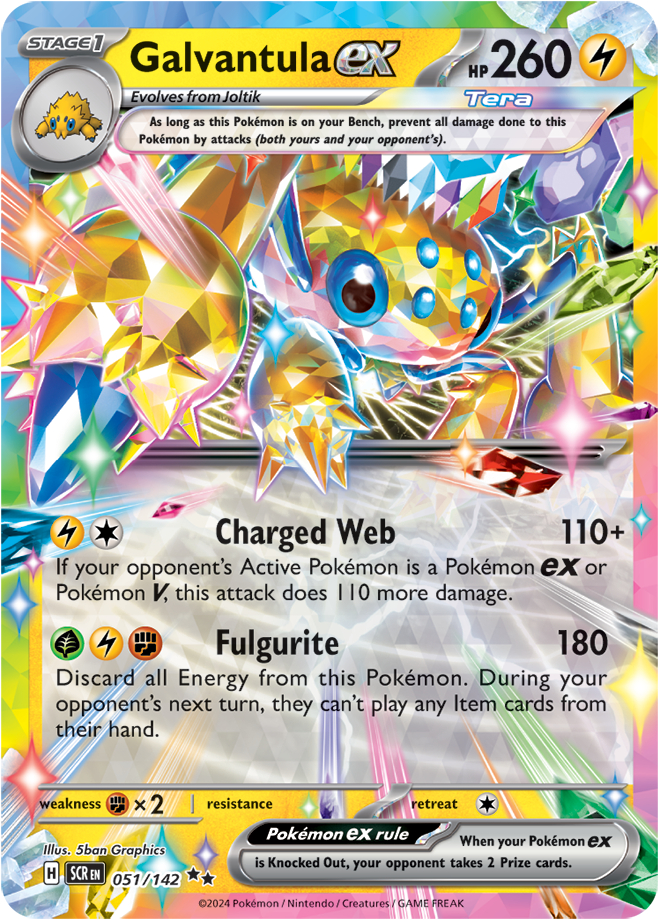 Of course, Fulgurite also comes with two big downsides; it takes three different Energy types to use, and you have to discard all of those Energy every time you use it. So, not only do you have to find a way to get it going in the first place, but to keep the Item lock live, you need to somehow reattach three different Energy every turn. This is where our Blissey ex combo comes in. Galvantula ex gives you the Tera Pokemon that you need to be able to use Glass Trumpet, so all you need to do to re-use Fulgurite is to attach an Energy, play a Glass Trumpet to get back the other two types, and move those Energy up with Happy Switch. This requires a little bit of setup to get to this point, but once you’re there, it’s rather easy to use Fulgurite turn after turn. In practice, it isn’t all that difficult to get to the first use of Fulgurite either, thanks to a few other tricks that this deck has up its sleeve. To explain those, let’s now take a look at the rest of the deck.
[premium]
My Galvantula ex List
Here’s my Galvantula ex / Blissey ex list:
[decklist name=”Galvantula ex” amt=”57″ caption=”” cname=”Galvantula” set=”Shrouded Fable” no=”2″][pokemon amt=”19″]3x Galvantula ex (SCR #51)1x [card name=”Galvantula” set=”Shrouded Fable” no=”2″ c=”deck2″ amt=”1″][/card]3x Joltik (SCR #50)1x [card name=”Joltik” set=”Paradox Rift” no=”64″ c=”deck2″ amt=”1″][/card]2x [card name=”Blissey ex” set=”Twilight Masquerade” no=”134″ c=”deck2″ amt=”2″][/card]3x [card name=”Chansey” set=”151″ no=”113″ c=”deck2″ amt=”3″][/card]1x Terapagos ex (SCR #128)1x [card name=”Raging Bolt ex ” set=”Temporal Forces” no=”123″ c=”deck2″ amt=”1″][/card]1x [card name=”Squawkabilly ex” set=”Paldea Evolved” no=”169″ c=”deck2″ amt=”1″][/card]1x [card name=”Bibarel” set=”Brilliant Stars” no=”121″ c=”deck2″ amt=”1″][/card]1x [card name=”Bidoof” set=”Crown Zenith” no=”111″ c=”deck2″ amt=”1″][/card]1x [card name=”Manaphy” set=”Brilliant Stars” no=”41″ c=”deck2″ amt=”1″][/card][/pokemon][trainers amt=”32″]4x [card name=”Carmine” set=”Twilight Masquerade” no=”145″ c=”deck2″ amt=”4″][/card]2x [card name=”Iono” set=”Paldea Evolved” no=”185″ c=”deck2″ amt=”2″][/card]2x [card name=”Arven” set=”Scarlet and Violet” no=”166″ c=”deck2″ amt=”2″][/card]2x [card name=”Boss’s Orders” set=”Brilliant Stars” no=”132″ c=”deck2″ amt=”2″][/card]1x Crispin (SCR #133)4x [card name=”Ultra Ball” set=”Paldean Fates” no=”91″ c=”deck2″ amt=”4″][/card]4x Glass Trumpet (SCR #135)3x [card name=”Buddy-Buddy Poffin ” set=”Temporal Forces” no=”144″ c=”deck2″ amt=”3″][/card]2x [card name=”Nest Ball” set=”Paldean Fates” no=”84″ c=”deck2″ amt=”2″][/card]1x [card name=”Super Rod” set=”Paldea Evolved” no=”188″ c=”deck2″ amt=”1″][/card]1x [card name=”Night Stretcher” set=”Shrouded Fable” no=”61″ c=”deck2″ amt=”1″][/card]1x [card name=”Switch” set=”Scarlet and Violet” no=”194″ c=”deck2″ amt=”1″][/card]1x [card name=”Earthen Vessel” set=”Paradox Rift” no=”163″ c=”deck2″ amt=”1″][/card]1x Sparkling Crystal (SCR #142)1x [card name=”Rescue Board ” set=”Temporal Forces” no=”159″ c=”deck2″ divide=”yes” amt=”1″][/card]2x Area Zero Underdepths (SCR #131)[/trainers][energy amt=”9″]3x [card name=”Fighting Energy” set=”Crown Zenith” no=”157″ c=”deck2″ amt=”3″][/card]3x [card name=”Lightning Energy” set=”Crown Zenith” no=”155″ c=”deck2″ amt=”3″][/card]3x [card name=”Grass Energy” set=”Crown Zenith” no=”152″ c=”deck2″ amt=”3″][/card][/energy][/decklist]
Pokemon
First, we have the Galvantula ex line. In addition to the Galvantula ex, I also have one non-ex [card name=”Galvantula” set=”Shrouded Fable” no=”2″ c=”name”][/card] in this list — the Grass-type Galvantula is in here as a tech for [card name=”Charizard ex” set=”Obsidian Flames” no=”125″ c=”name”][/card]. With the extra damage from Compound Eyes, an attached Lightning Energy, and Weakness, Shocking Web can OHKO a Charizard ex. It can also act as a non-ex attacker if needed and is a good out to [card name=”Mimikyu” set=”Paldea Evolved” no=”97″ c=”name”][/card]. I haven’t mentioned Joltik yet, but Jolting Charge is a pretty incredible attack and will be a centrepiece of your opening strategy when going second. Getting powered up to use Fulgurite is easy when you can simply attach four extra Energy on turn one. The Joltik split is to give you a way to not immediately lose to a turn-two [card name=”Dragapult ex” set=”Twilight Masquerade” no=”130″ c=”name”][/card] or [card name=”Regidrago VSTAR” set=”Silver Tempest” no=”136″ c=”name”][/card]; if you only have the 30 HP one, then the damage spread from Phantom Dive can KO two of your Benched Joltik, as well as your Active Pokemon (which tends to also be a Joltik when you’re going second). This can also be split into two of each, but I prefer having the increased starting chance of having the 30-HP Joltik when going second.
[cardimg name=”Blissey ex” set=”Twilight Masquerade” no=”201″ align=”right” c=”none”][/cardimg]
The [card name=”Blissey ex” set=”Twilight Masquerade” no=”134″ c=”name”][/card] is effectively this deck’s Energy acceleration engine, as Happy Switch is what allows those Energy that are accelerated with Glass Trumpet to get to the Galvantula ex that they need to be on. Getting Blissey ex into play is incredibly important, and because of Lucky Bonus, you don’t mind having extra [card name=”Chansey” set=”151″ no=”113″ c=”name”][/card], hence the 3-2 line. Chansey is a bit awkward too in that you can’t search it out with [card name=”Buddy-Buddy Poffin ” set=”Temporal Forces” no=”144″ c=”name”][/card], so it can be nice to have the third copy to make it easier to find. You could theoretically turn one of the Chansey into a [card name=”Nest Ball” set=”Paldean Fates” no=”84″ c=”name”][/card], but then you’re stuck playing with only one Blissey ex if you do prize one. While this isn’t impossibly detrimental, it does make things more difficult. If you’re in a format where you don’t think you need the non-ex Galvantula or the [card name=”Manaphy” set=”Brilliant Stars” no=”41″ c=”name”][/card] (which can happen depending on the meta), then it can be a good idea to replace those with a third copy of Blissey ex, to further solidify your odds of being able to play with two of them.
[card name=”Bibarel” set=”Brilliant Stars” no=”121″ c=”name”][/card] is good for the late game when this deck can be weak to [card name=”Iono” set=”Paldea Evolved” no=”269″ c=”name”][/card]. I have seen lists of this deck that play a 2-2 line, over some of the deck’s tech cards, illustrating the point that it can be rather important to have. I don’t mind it as a 1-1 since you’ll be able to take some Prizes before it becomes a necessity, but a thicker line can be worth considering. [card name=”Squawkabilly ex” set=”Paldean Fates” no=”75″ c=”name”][/card] is our other consistency Pokemon, and it tends to be a rather important one given how many different Pokemon you need to set up when playing this deck, especially when going first. The extra cards from Squawk and Seize will often be the difference between being able to set up your Blissey ex properly versus being a turn slower. In a pinch, you can also use Motivate for its Energy acceleration, which can come in handy.
Other Pokemon ex
In addition to the main pieces, I’ve also included two alternate attackers in this deck in [card name=”Raging Bolt ex ” set=”Temporal Forces” no=”123″ c=”name”][/card] and Terapagos ex. The Raging Bolt ex is included in this deck as a potential finisher and as an alternate strategy in some games. This deck conveniently already plays both Energy types that you need for Bellowing Thunder, and on top of that, it also plays Energy acceleration that you can use to bolster Bellowing Thunder’s damage output. As a result, it’s easy to get OHKOs with Raging Bolt ex. This eliminates a potential weakness of the deck in that Galvantula ex has limited damage output; Raging Bolt ex has no such limitation. When going second, Raging Bolt ex can be a main strategy following the mass acceleration from Jolting Charge. In matchups where you may struggle to set up Galvantula ex when going second, such as against a [card name=”Regidrago VSTAR” set=”Silver Tempest” no=”136″ c=”name”][/card] or [card name=”Dragapult ex” set=”Twilight Masquerade” no=”130″ c=”name”][/card] deck, it can be a good idea to pivot to a Bellowing Thunder strategy instead.
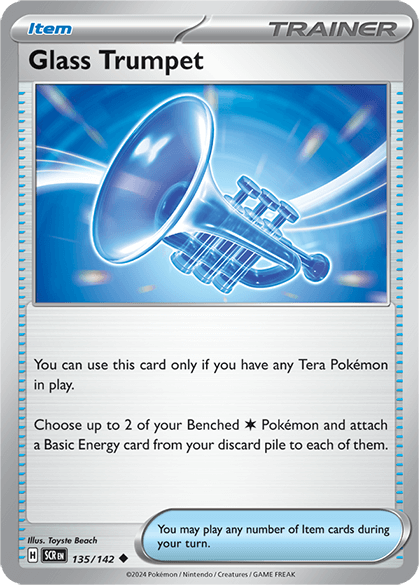 The Terapagos ex gives you another potential attacker, but more importantly, it gives you a way to use Glass Trumpet and Area Zero Underdepths in the early game, before you evolve into Galvantula ex. Both of those cards require a Tera Pokemon to be in play to use their effect, so without the Terapagos ex, you’re stuck waiting until you can evolve. This deck tends to discard a lot of cards early on with Squawkabilly ex and [card name=”Carmine” set=”Twilight Masquerade” no=”145″ c=”name”][/card], so it’s easy enough to get in a scenario on turn one where you have Energy in the discard pile and a Glass Trumpet in hand. Even if you can’t move the Energy quite yet, it sets you up to be able to do so on a later turn, or at the least gives you some extra Energy on the field to use with Bellowing Thunder later. Turn one also tends to be an important time to use the Area Zero Underdepths, as I’ll get into in the Trainers section.
You do have a few other Pokemon options that can be played in this spot, namely [card name=”Teal Mask Ogerpon ex” set=”Twilight Masquerade” no=”25″ c=”name”][/card] and [card name=”Cornerstone Mask Ogerpon ex” set=”Twilight Masquerade” no=”112″ c=”name”][/card], but I’ve found Terapagos ex to be the best of the three, mostly because it’s an additional target for Glass Trumpet. Cornerstone Mask Ogerpon ex can be more useful in some metagames, so that’s one to hold onto and consider; Teal Mask Ogerpon ex is unfortunately not all that good, as in practice you’ll rarely be able to use Teal Dance with how few Grass Energy the deck plays. If you’re going into the Raging Bolt ex strategy outlined in the previous paragraph, having a way to use Glass Trumpet is necessary; otherwise, you’ll quickly run out of Energy. While you may only occasionally use it as an attacker itself, Terapagos ex’s multiple benefits make it well worth the spot. Finally, it’s possible to attack with Crown Opal in this deck, thanks to Sparkling Crystal; this tends to be super niche in terms of usefulness, but it can come up on occasion.
My initial list of this deck didn’t have [card name=”Manaphy” set=”Brilliant Stars” no=”41″ c=”name”][/card] in it, but that was quickly proven to be a mistake when I played against a few of the new [card name=”Origin Forme Palkia VSTAR” set=”Astral Radiance” no=”40″ c=”name”][/card] / Terapagos ex decks. Not many decks in the Worlds format played a way to attack with [card name=”Radiant Greninja” set=”Astral Radiance” no=”46″ c=”name”][/card], but Origin Forme Palkia VSTAR does, and it will consistently get it off on turn two. If you aren’t prepared for it, that can easily mean two KO’d Joltik. Add in the Manaphy though, and that matchup becomes positive, as Galvantula ex can quite easily deal with Origin Forme Palkia VSTAR thanks to Weakness. With that said, if the Origin Forme Palkia VSTAR build does not become common in the US like it is in Japan, then you can take out the Manaphy, as the deck spot is rather important for better consistency.
Trainers
This Trainer lineup is a bit unorthodox, as this deck is one of the few where I’ve found [card name=”Carmine” set=”Twilight Masquerade” no=”145″ c=”name”][/card] to be worth playing. While you might think that with the Energy acceleration from Joltik’s Jolting Charge the deck wants to go second, in practice with how this deck’s strategy plays out, you want to go first most of the time so that you give your opponent as little time as possible to use Items. This is especially the case against [card name=”Regidrago VSTAR” set=”Silver Tempest” no=”136″ c=”name”][/card], [card name=”Charizard ex” set=”Obsidian Flames” no=”125″ c=”name”][/card], and [card name=”Dragapult ex” set=”Twilight Masquerade” no=”130″ c=”name”][/card] decks. The awkward thing about this deck is that it does require a bit of setup to get to the point where you can chain Fulgurite, but it’s harder to get that set up early without using a turn-one Supporter. Carmine helps to solve that problem, by giving you additional draw power when going first so that you can get all of the Pokemon you need into play. Between Carmine and [card name=”Squawkabilly ex” set=”Paldean Fates” no=”75″ c=”name”][/card], you’ll get an additional eleven cards to work with on turn one, which tends to be plenty for finding those much-needed Basic Pokemon and setting up for a turn two attack. With a decent draw, you may also not need the Squawkabilly ex, which can give you some advantages later on by not having an easy two-Prize Pokemon available for your opponent. Between the Carmine engine and Joltik’s Jolting Charge, this deck can play well regardless of whether or not it wins the coin flip, giving you a decent chance in Game 1 before you know what you’re up against.
[card name=”Iono” set=”Paldea Evolved” no=”185″ c=”name”][/card] and [card name=”Arven” set=”Obsidian Flames” no=”186″ c=”name”][/card] are our two other consistency Supporters of choice. Iono is a great card in this deck, as hand disruption + Item lock is a natural combo. Arven can help our setup by allowing us to find [card name=”Buddy-Buddy Poffin ” set=”Temporal Forces” no=”144″ c=”name”][/card], and can be used to find Glass Trumpet later in the game. It can also search out our Sparkling Crystal, which is quite helpful, and it can find [card name=”Rescue Board ” set=”Temporal Forces” no=”159″ c=”name”][/card] on turn one to help us easily get into Joltik so that we can use Jolting Charge. Our new Supporter in this deck is Crispin, a card which gives us a bit more Energy acceleration, as well as additional Energy search.

The Items in this deck are nothing out of the ordinary, mostly a bunch of search cards to find Pokemon and Energy, as well as our four Glass Trumpet. Our ACE SPEC of choice in this deck is another new card, Sparkling Crystal. Sparkling Crystal is a great ACE SPEC, and particularly shines in this deck by making it much easier to attack with Galvantula ex. Not only is Sparkling Crystal effectively a Rainbow-type Energy that is searchable with Arven, but it also acts as Energy acceleration, since it’s a Pokemon Tool and you can attach both it and an actual Energy card in the same turn. You also don’t discard it with Fulgurite, which makes it easier to use Fulgurite again on the following turn. Conveniently, Fulgurite also prevents your opponent from removing the Sparkling Crystal with [card name=”Lost Vacuum” set=”Crown Zenith” no=”135″ c=”name”][/card], so it’s even safer to use than it would be on a different Pokemon.
For the deck’s Stadium, I’ve once again turned to the new Stellar Crown cards. Area Zero Underdepths solves a problem that I was consistently having with earlier builds of this deck; namely, that it is quite difficult to build up a board of multiple Galvantula ex, [card name=”Blissey ex” set=”Twilight Masquerade” no=”134″ c=”name”][/card], and a [card name=”Bibarel” set=”Brilliant Stars” no=”121″ c=”name”][/card], particularly if you need to use [card name=”Manaphy” set=”Brilliant Stars” no=”41″ c=”name”][/card] or Squawkabilly ex. By expanding our Bench size to eight, it’s easy to fit all of those Pokemon down, while even leaving a spot open for [card name=”Chansey” set=”151″ no=”113″ c=”name”][/card] with Lucky Bonus. Including this Stadium also gives you a potential way to bump Squawkabilly ex or a damaged Galvantula ex off of your field, which can eliminate your opponent’s win condition in some games. This deck unfortunately doesn’t have the room to play [card name=”Lost Vacuum” set=”Lost Origin” no=”162″ c=”name”][/card], so it doesn’t work quite as well, but it does make it so your opponent has to play around the possibility.
Energy
The Energy in this deck are simply three of each, with no preference toward any one type. One option I have seen some people go with is to also include a copy of [card name=”Luminous Energy” set=”Paldea Evolved” no=”191″ c=”name”][/card], either over one of the Fighting Energy or as a tenth Energy. While it does make sense, given the multiple different types needed in this deck, I don’t like Luminous Energy in practice, as you can’t search it out, can’t recover it, and can’t move it with Happy Switch. A tenth Energy is fairly low on the list of priorities for this deck (as it functions quite well with nine), and you can start to run into some difficulties with Prizes if you opt to play only two of a certain type. So, I would recommend sticking with the nine Basics.
Gameplay with Galvantula ex
This deck has a lot of moving parts, but it thankfully isn’t all that tricky to play. Your early game will be mostly focused on getting your Basic Pokemon into play, particularly your Joltik and your Chansey. If you go second, you’ll also want to find a way to use Jolting Charge, so that you can be ready to go with your attackers from turn two onward. I tend to play the early game with this deck pretty aggressively, especially when I’m going first. The idea here is that if I can set up properly, I should be able to win, so I want to do whatever I can to get to that point, even if it means discarding resources with [card name=”Carmine” set=”Twilight Masquerade” no=”145″ c=”name”][/card] and Squawk and Seize.
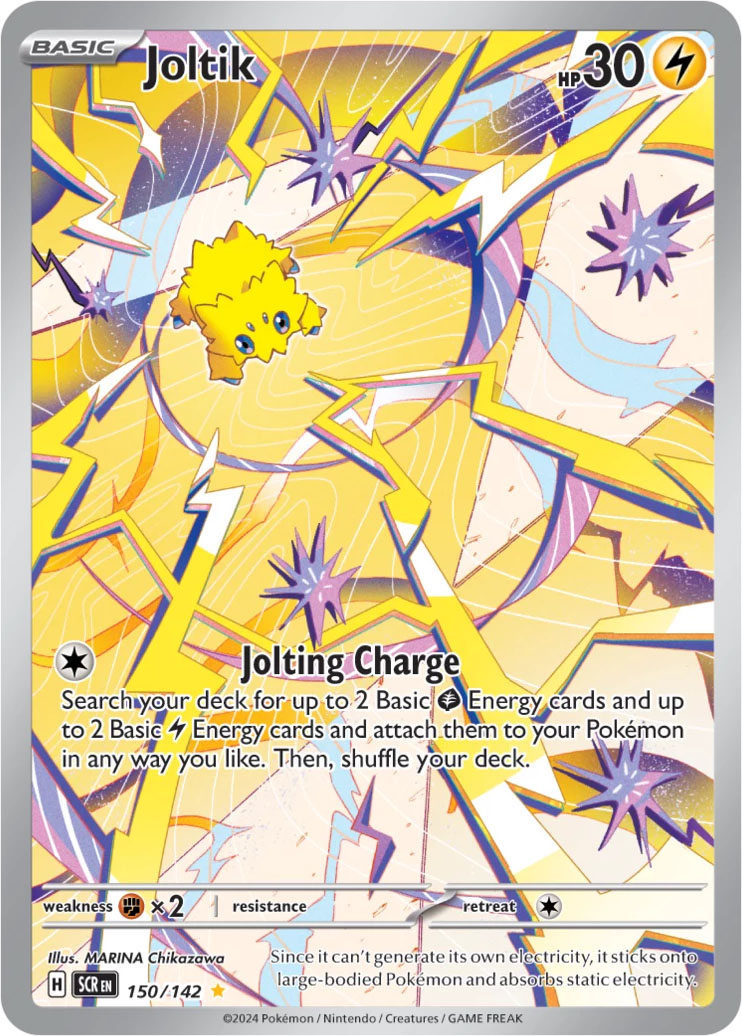
At the least, I want to have a pair of Joltik and a Chansey in play, so that even if one Joltik gets KO’d on my opponent’s first turn, I can still potentially use Fulgurite on my second turn. More ideally, I’d like to be able to get out Bibarel and a pair of Blissey ex, along with my Galvantula ex, so that I can have my full board set up and go from there. When finding Pokemon, the priority should be Joltik, then Chansey, then [card name=”Bidoof” set=”Crown Zenith” no=”111″ c=”name”][/card]. With that said, it can sometimes be a good idea to use [card name=”Nest Ball” set=”Paldean Fates” no=”84″ c=”name”][/card] to find Chansey first if you are then going to be able to draw a new hand with Carmine or Squawk and Seize. The reason for this is that you can’t get Chansey with [card name=”Buddy-Buddy Poffin ” set=”Temporal Forces” no=”144″ c=”name”][/card], so you have more outs to Joltik than you do to Chansey. If you are up against a deck that can deal Bench damage, then Manaphy also becomes a priority. Be sure to thoroughly check your Prizes as well, as your future strategies may change depending on what resources you have available. If you have any Chansey prized, then that may open you up to earlier win conditions as well, which can play a big factor in deciding whether or not you want to scoop up a game that seems to be getting out of hand.
Once you are on turn two and can start attacking, you’ll want to consider how you plan to win the game. That is, can you win by being aggressive with Charged Web, or do you want to prioritize using Fulgurite to slow down your opponent. This depends a bit on the matchup, and how strong both players’ setups were. Against a deck that is heavily reliant on Items and can turn the matchup around once they get to use those Items, you’ll want to try to keep using Fulgurite as much as you can. For instance, if you’re up against a [card name=”Charizard ex” set=”Obsidian Flames” no=”125″ c=”name”][/card] deck, getting a KO on [card name=”Rotom V” set=”Lost Origin” no=”58″ c=”name”][/card] is much less important than continuing to keep your opponent from using [card name=”Rare Candy” set=”Paldean Fates” no=”89″ c=”name”][/card]. In some matchups, this can turn the other way, where a KO might be more important. For example, if you’re up against a [card name=”Miraidon ex” set=”Scarlet and Violet” no=”81″ c=”name”][/card] deck that was able to attach a bunch of Energy on turn one, it may not matter all that much if you can keep them from using Items, so instead, you may try to outrace them to six Prizes by getting KOs each turn with Charged Web. Again though, this can depend on the situation; against a Miraidon ex that failed to find an early [card name=”Electric Generator” set=”Scarlet and Violet” no=”170″ c=”name”][/card], Item lock may be able to prevent them from attacking at all, which can get you further ahead over a few turns than Charged Web might.
Your thought process here should be comparative; think through how your opponent will be able to attack you if they have or don’t have Items on their following turn(s). You’ll also want to consider your own resources; if things are otherwise even, it may be better to use Charged Web, and save your Energy attachments to allow for easier use of Fulgurite later in the game, or with your second or third attackers.
Sometimes Good, Sometimes Not
[cardimg name=”Vikavolt V” set=”Darkness Ablaze” no=”180″ align=”right” c=”none”][/cardimg]
Because of how the Galvantula ex deck approaches matchups, it naturally has a rather polarized matchup spread. Against decks that rely heavily on Items, it has a lot of success. Against decks that do not, however, it fares much more poorly. The good news for Galvantula ex is that, as I explained above, many of the top decks in the format do indeed rely on Items. As such, there’s a large enough component of the metagame that Galvantula ex matches up well for it to see success. For winning events, polarizing decks tend to work pretty well, particularly if the positive matchups make up a large part of the meta. In the past, players have piloted decks with similar matchup spread polarization like [card name=”Vikavolt V” set=”Darkness Ablaze” no=”60″ c=”name”][/card] or [card name=”Duraludon VMAX” set=”Crown Zenith” no=”104″ c=”name”][/card] to major event wins, even while knowing that if the matchup luck doesn’t go their way, it could be a quick tournament.
So, when playing a deck like Galvantula ex, you want to be aware of your own risk tolerance. That is, if you don’t mind the potential chance of going 0-3 drop, and want something that might have relatively higher odds of getting you a Regional Championship win, then Galvantula ex might be a deck for you. On the other hand, if you’re a player who prefers playing something that can give you a decent matchup into just about anything, then Galvantula ex is not the kind of deck you want to be playing.
I wouldn’t necessarily expect Galvantula ex to become the newest widespread top-tier deck; between the polarizing matchup spread, the difficulty in getting a good list together, and the strength of existing decks, there may not be many converts to this new archetype. With that said, that can be a good thing for those who do hop aboard the Galvantula ex-train. A low meta share for Galvantula ex would mean that other decks aren’t going to be adjusting their lists with it in mind. For instance, you likely won’t see a bunch of Charizard ex decks opt to play heavier counts of [card name=”Technical Machine: Evolution” set=”Paradox Rift” no=”178″ c=”name”][/card] if there aren’t enough Galvantula ex decks to make them worry about being overly reliant on [card name=”Rare Candy” set=”Paldean Fates” no=”89″ c=”name”][/card]. Likewise, fewer players will have played against Galvantula ex, which can be a boon, given that this deck’s Item lock strategy isn’t one that they will have experienced in a different matchup. So, if you do pick up this deck and enjoy it, but aren’t seeing a ton of other players do the same, don’t worry — that’s a good thing for you. You’ll certainly want to keep an eye on the metagame, as sometimes Galvantula ex simply won’t be good, but if you can play it in the tournaments where the meta is favorable, this deck has the potential to do extremely well.
We’ve now come to the end of this article, but as always, if you have any questions, be sure to ask below in the comment section! Best of luck to everyone, and stay safe! Thanks for reading!
[/premium]